- Instagram chatbot
- Subscriber Manager
- E-commerce store
- Private Reply
- Full Video Tutorial on Instagram Chatbot
Instagram chatbot
Instagram chatbot, a CoxPost feature, is an Instagram chatbot-building
platform. If you have the feature, you can build Instagram chatbot
easily. Like CoxPost, the main application, the Instagram chatbot has
two types of bot-building platforms, -- classic bot builder and Flow
Builder, a visual drag and drop chatbot editor. Note that Flow Builder
is an add-of CoxPost. Therefore, if you want to build Instagram chatbot
on the Flow Builder, you have to add the feature to CoxPost first.
Otherwise, you have to build an Instagram chatbot on the classic bot
builder.
First, you have to import your Instagram account into CoxPost. Then you have to enable the bot connection.
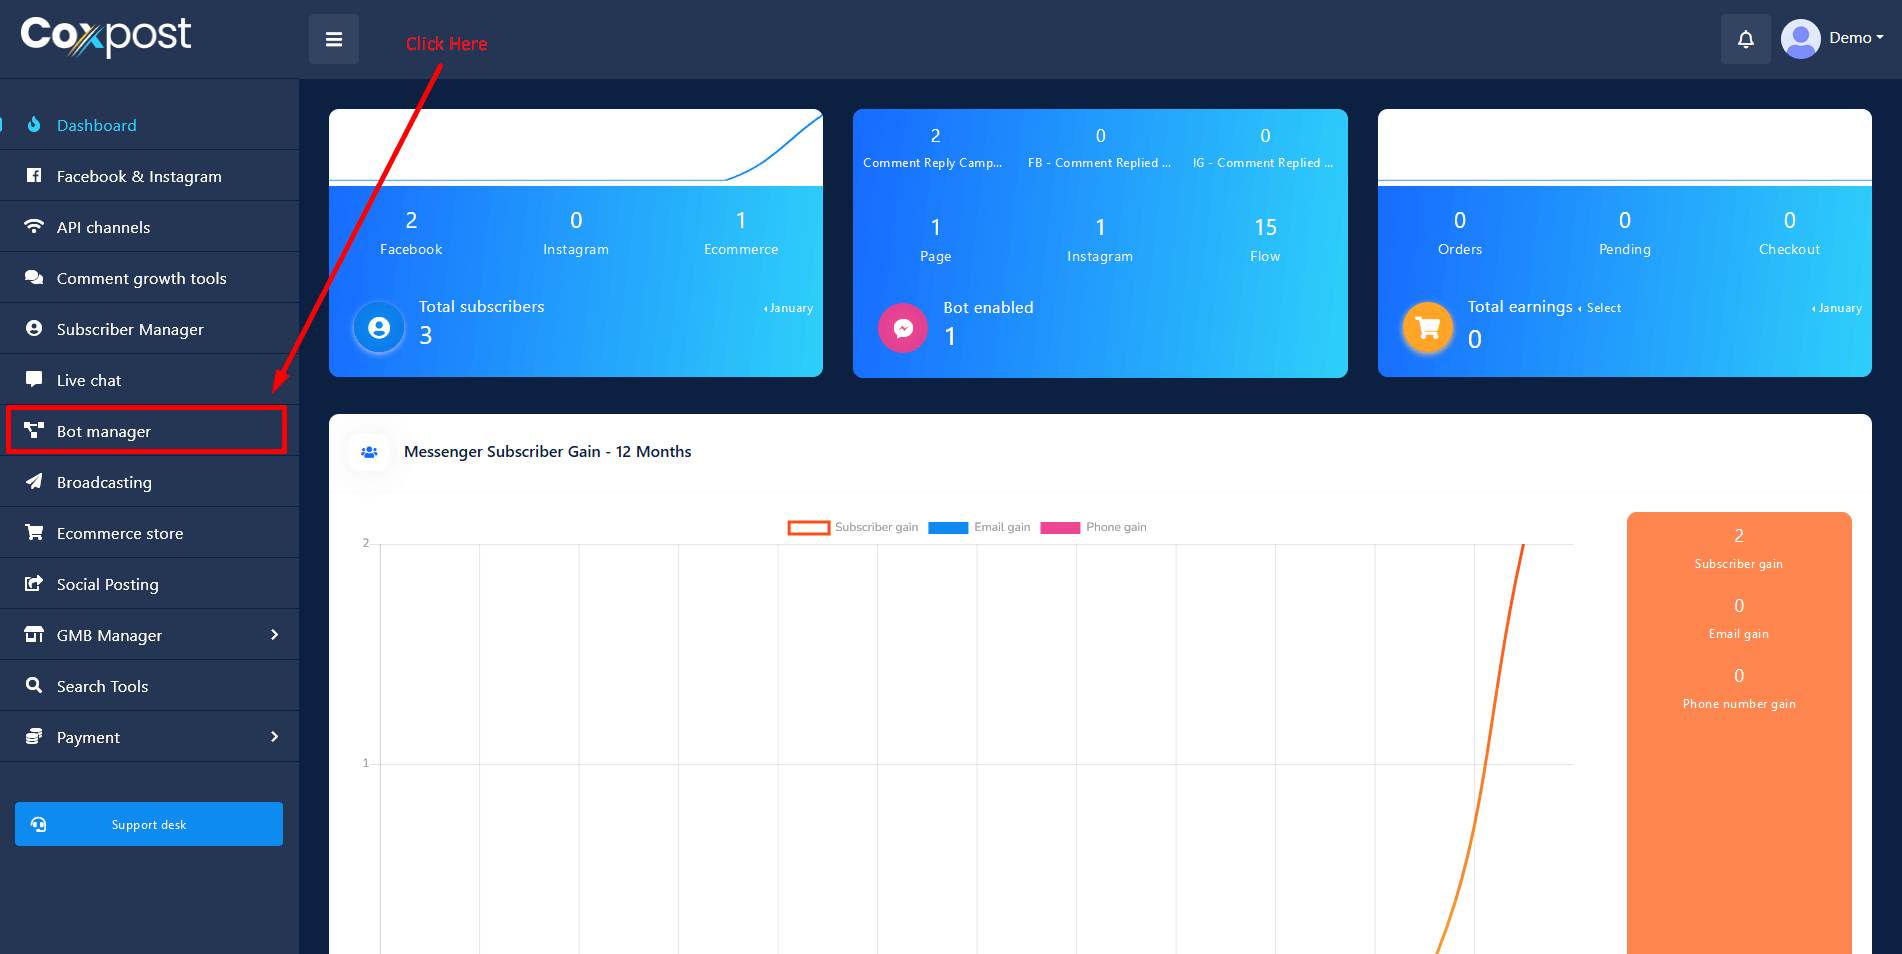
After that, go to the Dashboard of the CoxPost. Click on the Bot Manager option at the left sidebar.
The Instagram chatbot settings page will appear without delay. The
Instagram chatbot settings page is divided into three sections.
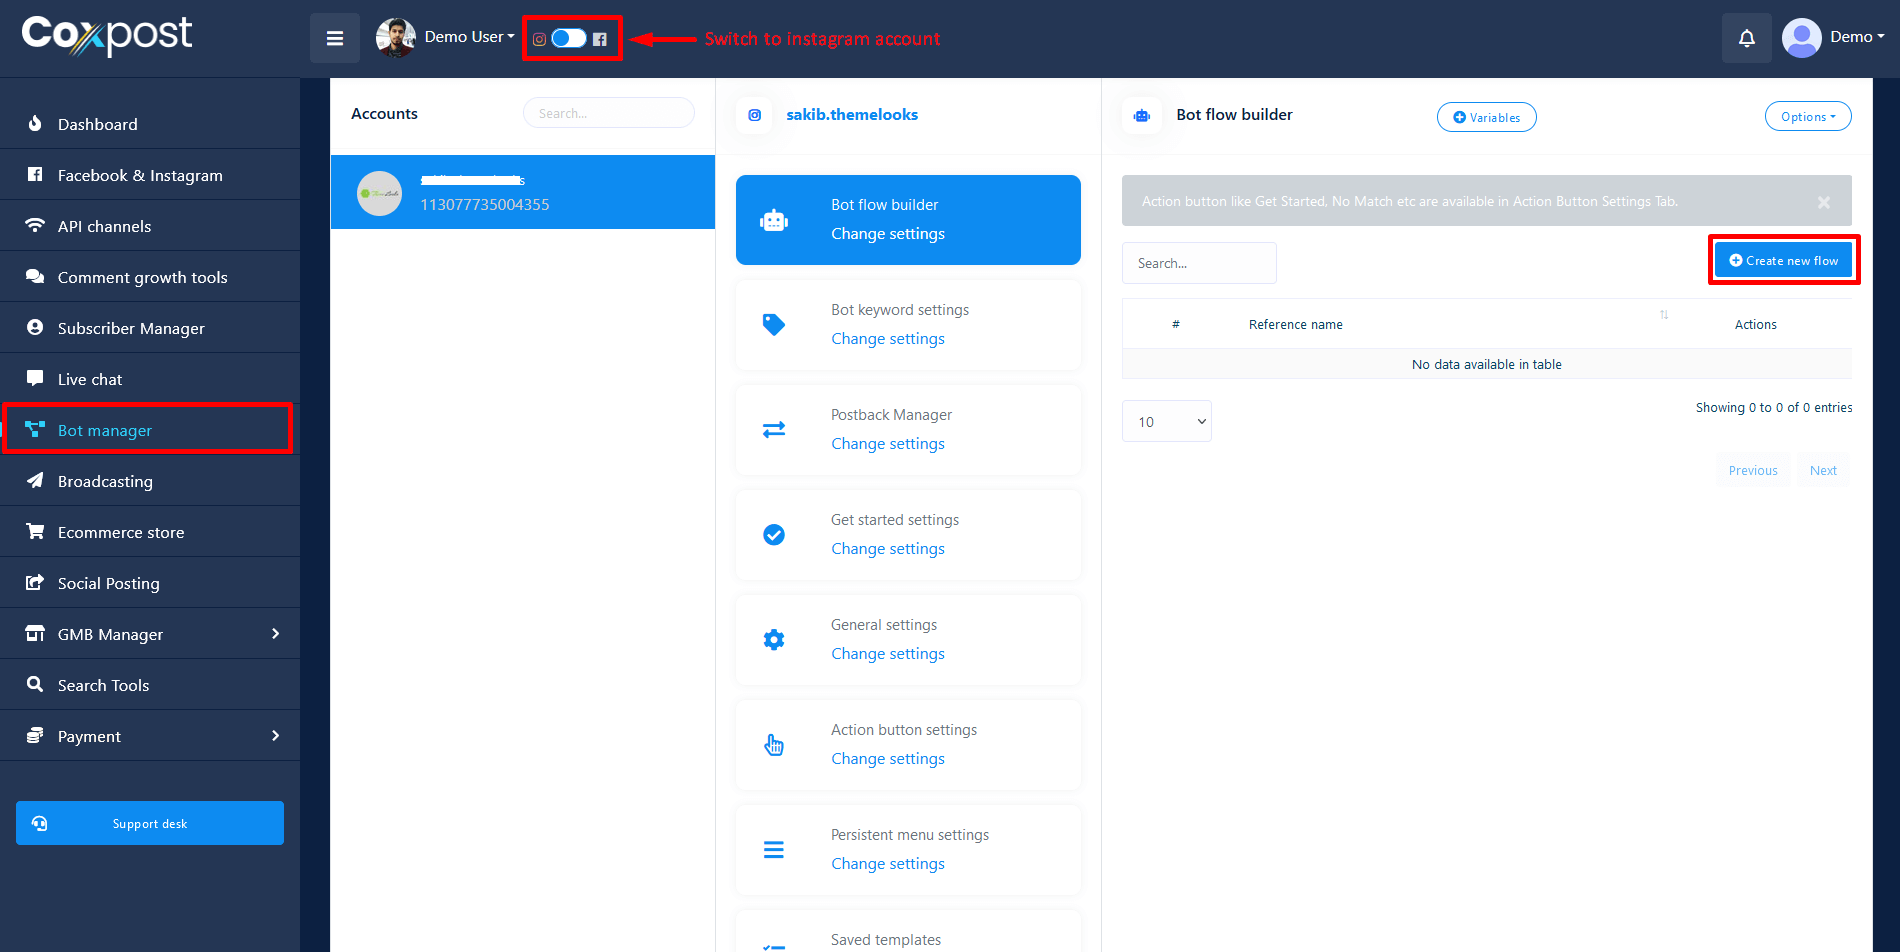
In the accounts section, you have to select the Instagram profile for
which the bot will be created. Then go to create new flow.
At the top of the Bot reply settings section, you will see a button
called variables. Click on the button to learn how to use variables in
the bot reply settings. Without delay, a show modal with some text will
appear. Read the text, to learn about how to use variables in the bot
reply settings.
At the right, you will see the Add Bot Reply button. Click on the Button
and instantly appear a form you have to fill up to build an Instagram
chatbot.
Now let’s fill out the form:
First, provide a bot name in the Bot name Field. Then provide keywords
in comma-separated in the field below. After that, you have to select a
reply type. By default, the reply type Text is selected. To select
another reply type, click on the the select reply type field and a
drop-down menu of different reply types such as Text, Image, Quick
Reply, Generic Template, Carousel, User Input Flow, and E-commerce will
appear. You have to click on the Reply type you want to select.
Text Component
Text component will allow you to reply text content only. It has 1 input socket and 3 output sockets.
- Input: Reply
- Output: Next, Buttons, and QuickReplies
Next or QuickReplies!?
There is a condition between Next and QuickReplies. Using either Next or QuickReplies, you can connect to other components. But you can't connect to others from both.
Connections
Reply may get connection from one of the following components:
- Start Bot Flow, New Postback, Text, Carousel, Facebook Media, Image, Video, Audio, File, Generic Template, E-commerce, OTN
Next may be connected to one of the following components:
- Text, Carousel, Facebook Media, Image, Video, Audio, File, User Input Flow, Generic Template, E-commerce, OTN
Buttons may be connected to the following component:
-
Button - you may connect up to 3 Button components to the Text component.
Quick Replies may be connected to the following component:
-
Quick Reply - you may connect up to 11 QuickReply components to the Text component.
How to create
Let us see how we can create a reply with text.
Dragging and Dropping
From the dock menu, drag the Text component and drop it on the editor at any place.
Adding Data
To add data to the Text component, click twice on the body of the Text component. It will open a sidebar on your right. Fill in the fields that you need.
Delay in Reply
If you want to show the typing state on the bot or delay in replying, then you can use those fields.

Image Component
Image component will allow you to reply with an image. It has 1 input socket and 2 output sockets.
- Input: Reply
- Output: Next, QuickReplies
QuickReplies: You can connect up to 11 QuickReply components to the Image component.
Next or QuickReplies!?
There is a condition between Next and QuickReplies. Using either Next or QuickReplies, you can connect to other components. But you can't connect to others from both.
Connections
Reply may get connection from one of the following components:
- Start Bot Flow, New Postback, Text, Carousel, Facebook Media, Image, Video, Audio, File, E-commerce, Generic Template, OTN
Next may be connected to the following components:
- Text, Carousel, Facebook Media, Image, Video, Audio, File, E-commerce, User Input Flow, Generic Template, OTN
QuickReplies may be connected to the following component:
- Quick Reply
How to create
Let us see how we can create a reply with an image.
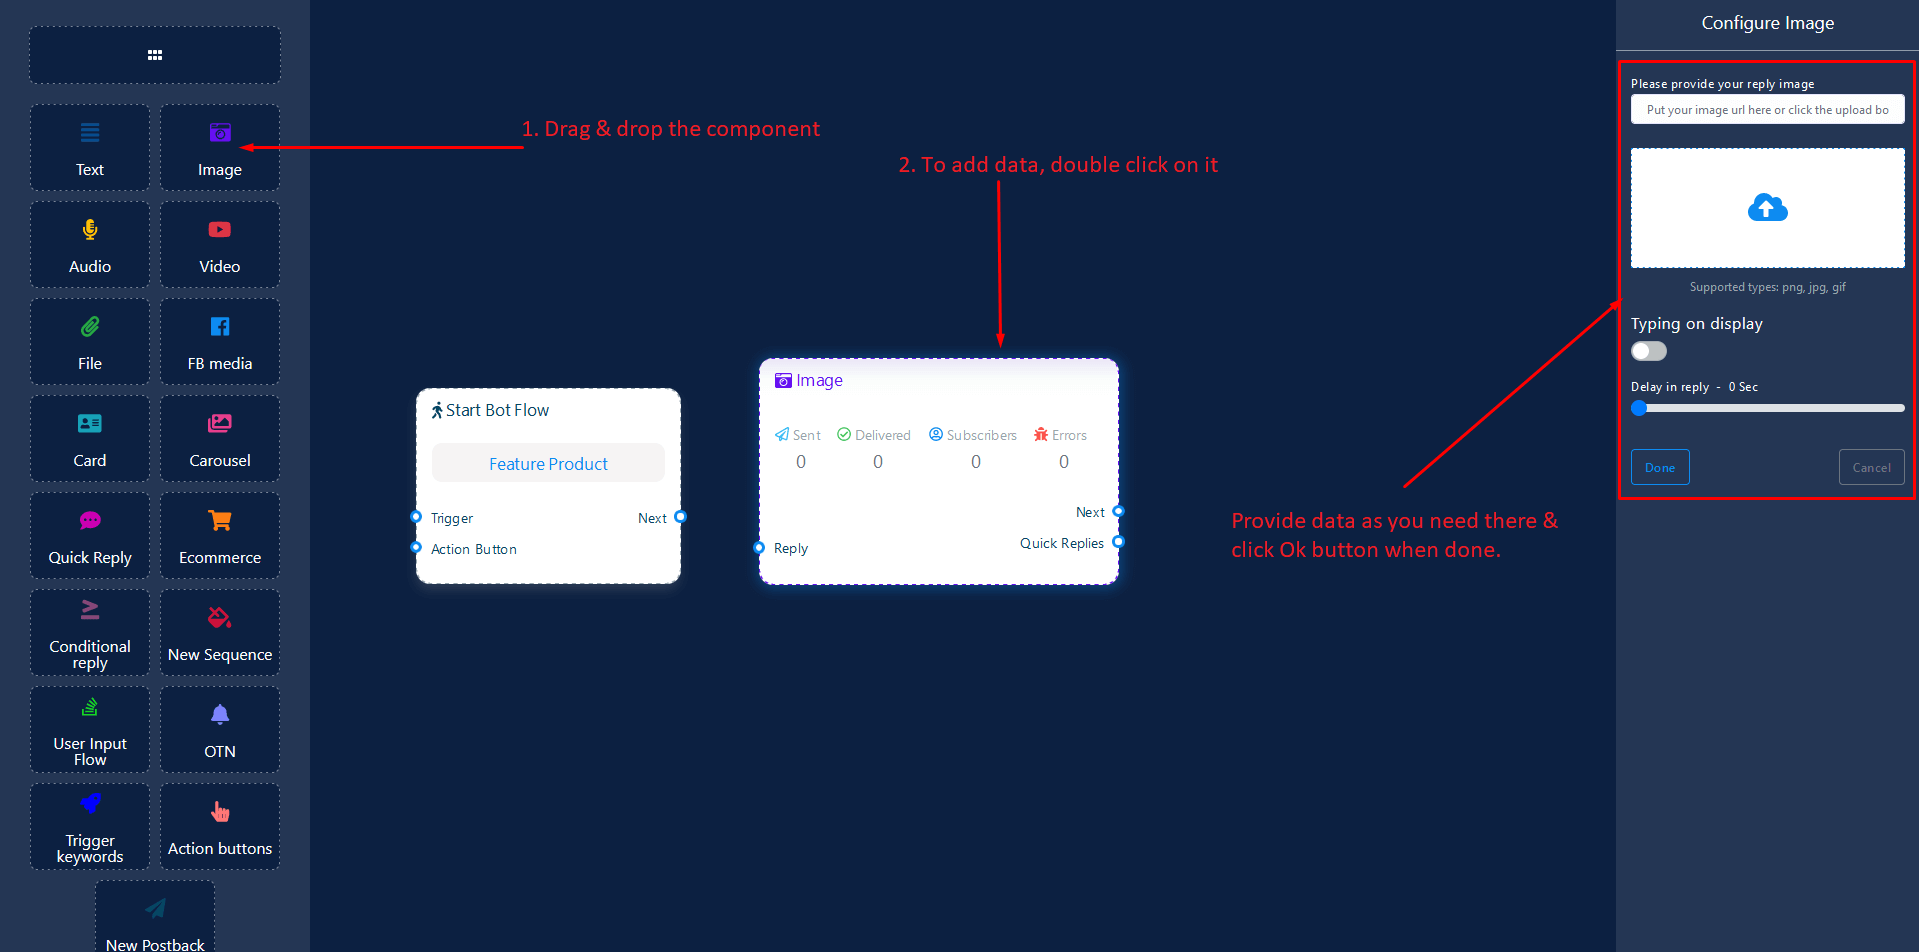
Dragging and Dropping
From the dock menu, drag the Image component and drop it on the editor at any place.
Adding Data
To add data to the Image component, click twice on the body of the Image component. It will open a sidebar on your right. Fill in the fields that you need.
Delay in Reply
If you want to show the typing state on the bot or delay in replying, then you can use those fields.
Quick Reply Component
QuickReply component will allow you to reply quickly creating a New Postback, using an existing Postback, using your Facebook page's Phone number or Email address. It has only 1 input socket and 1 output socket.
- Input: Reply
- Output: NewPostback
QuickReply Type Clarification
If your quick-reply type is something other than New Postback, then you can NOT connect this QuickReply component to other components via its NewPostback output socket. Because it only allows New Postback component to be connected. See the connections section.
Connections
Reply may get connection from one of the following components:
- Text, Carousel, Facebook Media, Image, Video, Audio, File, E-commerce, Generic Template
NewPostback may be connected to the following component:
- New Postback
How to create
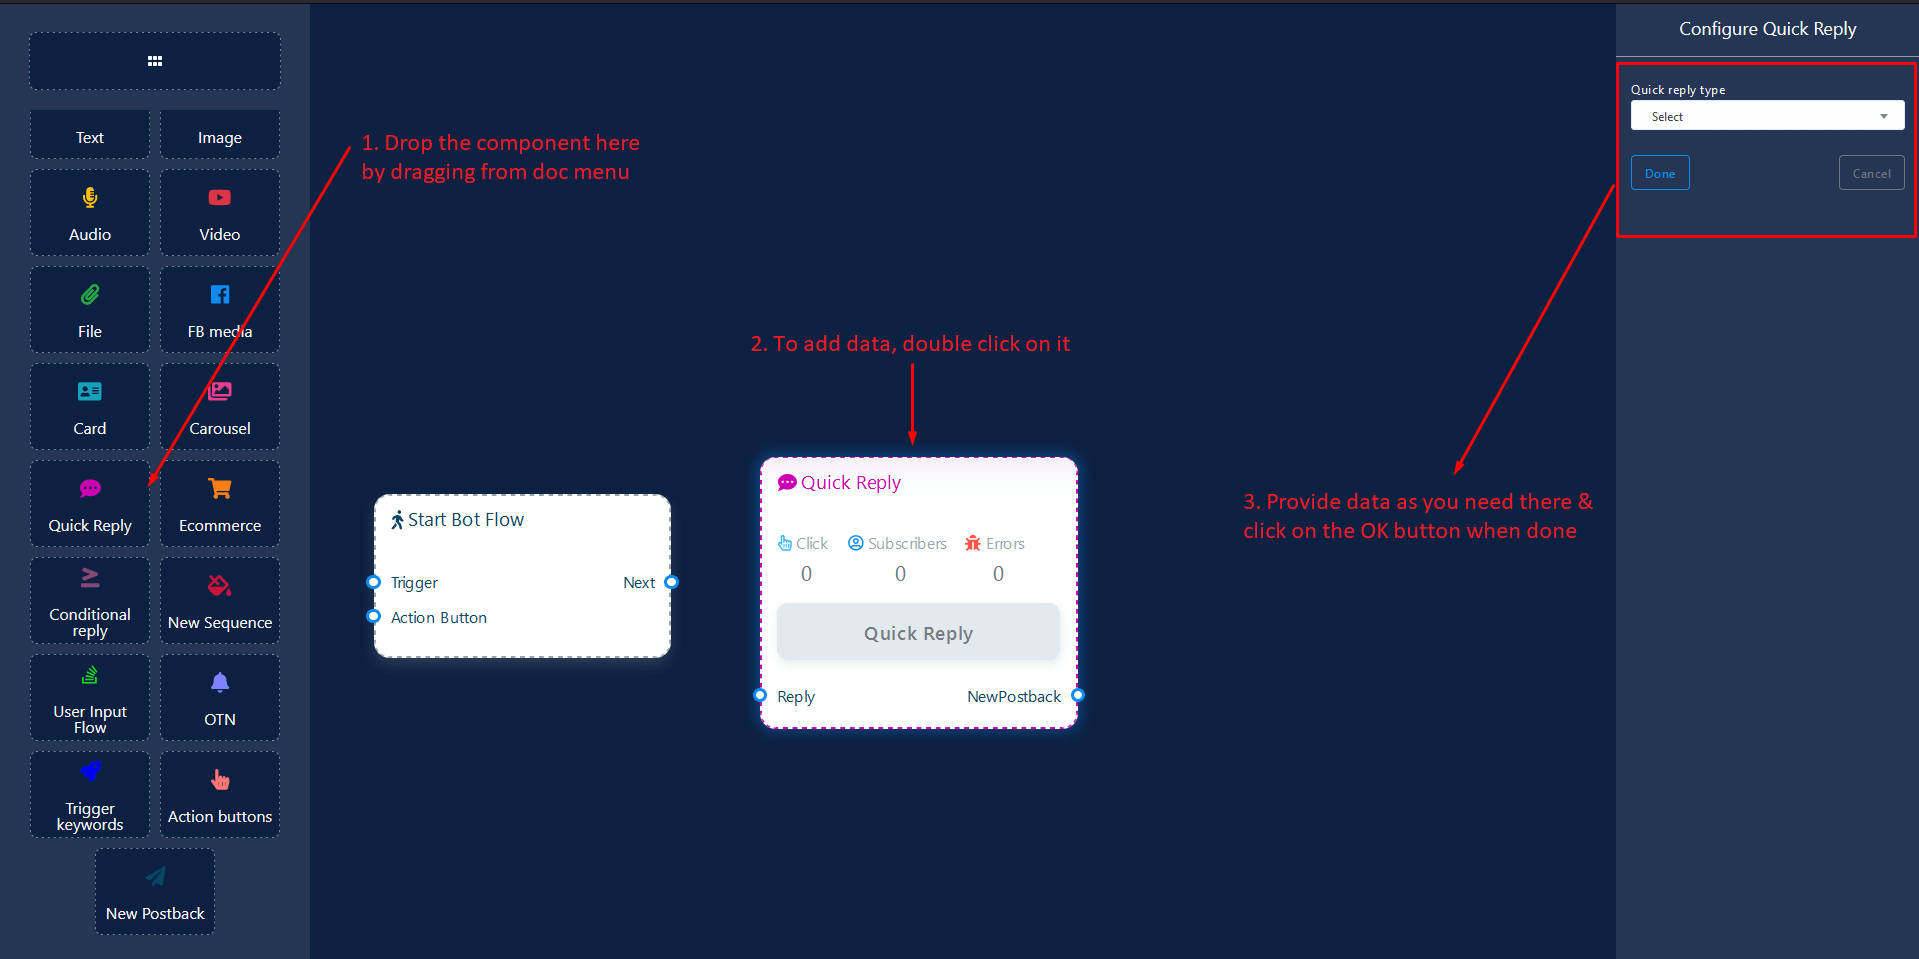
Let us see how we can create a quick-reply.
Dragging and Dropping
From the dock menu, drag the QuickReply component and drop it on the editor at any place.
Adding Data
To add data to the QuickReply component, click twice on the body of the QuickReply component. It will open a sidebar on your right. Fill in the fields that you need.
Delay in Reply
If you want to show the typing state on the bot or delay in replying, then you can use those fields.
Carousel Component
Carousel component will allow you to reply with a carousel. It has 1 input socket and 3 output sockets.
- Input: Reply
- Output: Next, Items, Quick Replies
Next or QuickReplies!?
There is a condition between Next and QuickReplies. Using either Next or QuickReplies, you may connect to other components. But you can't connect to others from both.
Connections
Reply may get connection from one of the following components:
- Start Bot Flow, New Postback, Text, Carousel, Facebook Media, Image, Video, Audio, File, E-commerce, Generic Template, OTN
Next may be connected to one of the following components:
- Text, Carousel, Facebook Media, Image, Video, Audio, File, E-commerce, User Input Flow, Generic Template, OTN
Items may be connected to the following component:
-
Carousel Single - you may connect up to 10 Carousel Single components to the Carousel components.
Quick Replies may be connected to the following component:
-
Quick Reply - you may connect up to 11 Quick Reply components to the Carousel components.
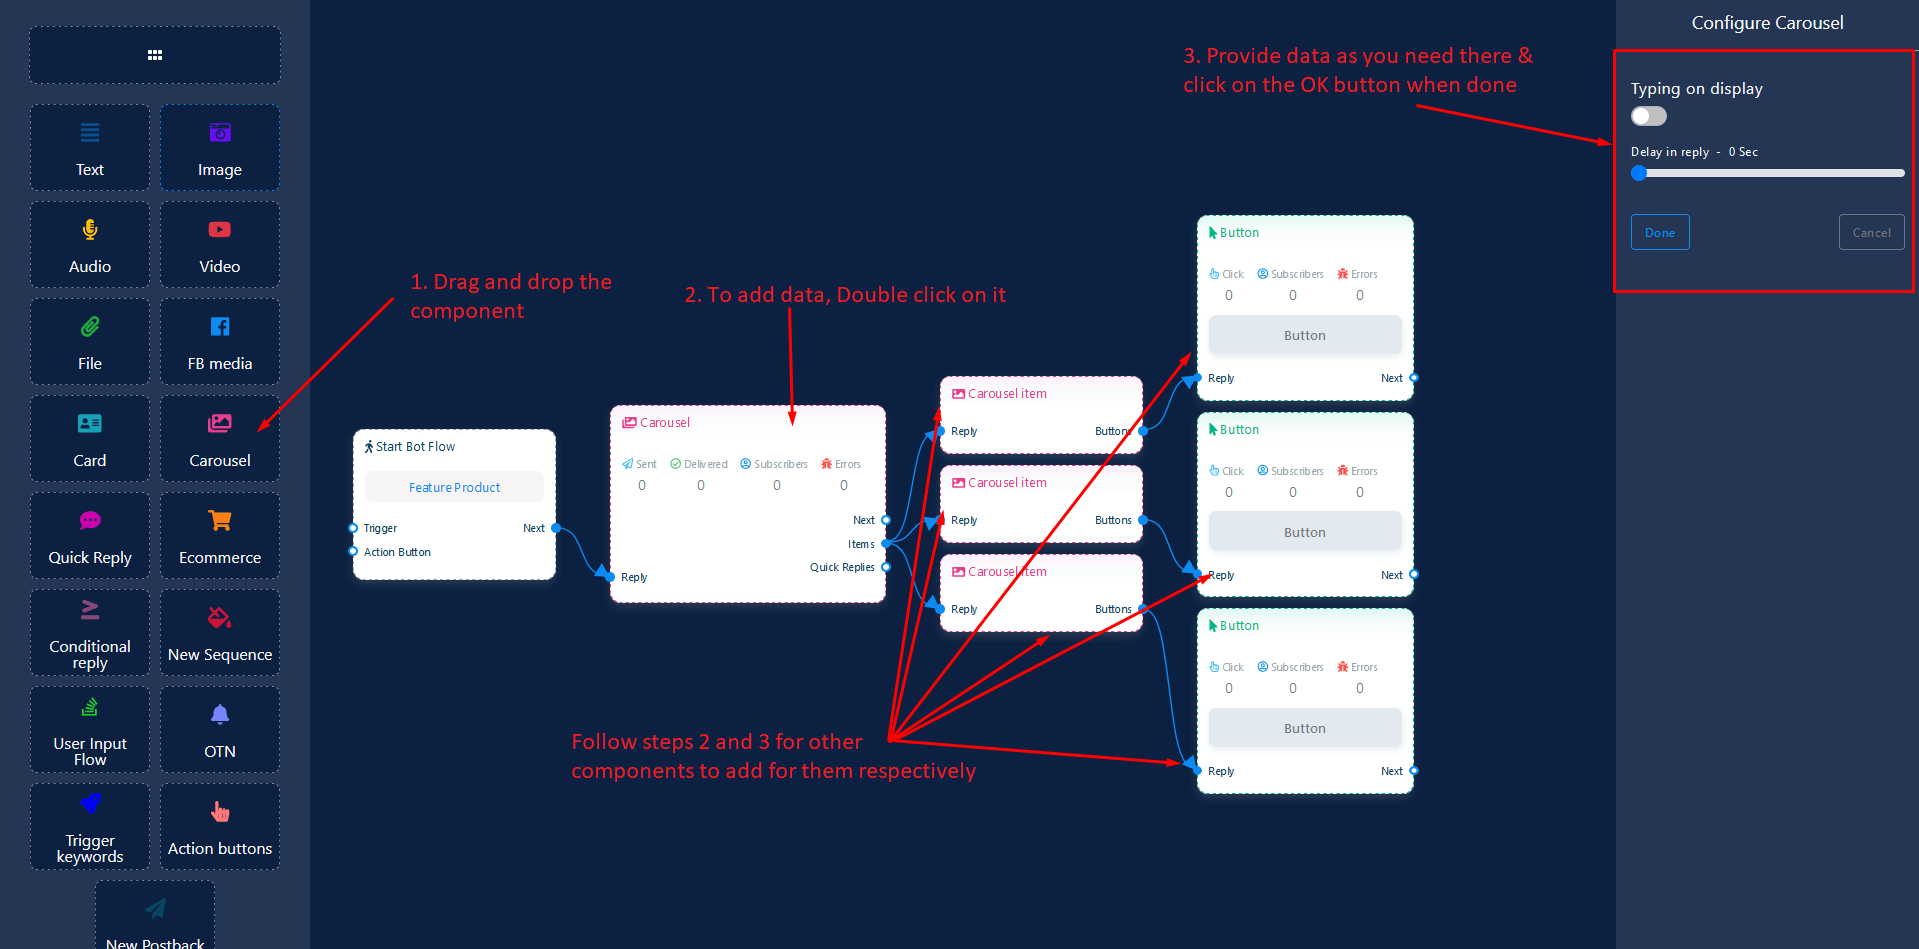
How to create
Let us see how we can create a reply with carousel
Dragging and Dropping
From the dock menu, drag the Carousel component and drop it on the editor at any place. Next, you see 3 Carousel Single components and 3 Button components have been created with Carousel component.
Adding Data
To add data to the Carousel component, click twice on the body of the Carousel component. It will open a sidebar on your right with only fields asking reply-delay and type-state. Interact with them if you need.
By default, we provided 3 carousel single items. You can add more if you wish. Now it's time to prepare carousel single component. Make double-click on each of them to provide data as you need.
Having done with filling in carousel single, you may go for button component to be provided with your carousel. Make double-click on the button component to fill in data as you need.
User Input Flow Component
UserInputFlow component will allow you to reply with a user input flow. It has only 1 input socket.
- Input: Reply
Connections
Reply may get connection from one of the following components:
- Start Bot Flow, New Postback, Text, Carousel, Facebook Media, Image, Video, Audio, File, E-commerce, Generic Template, OTN
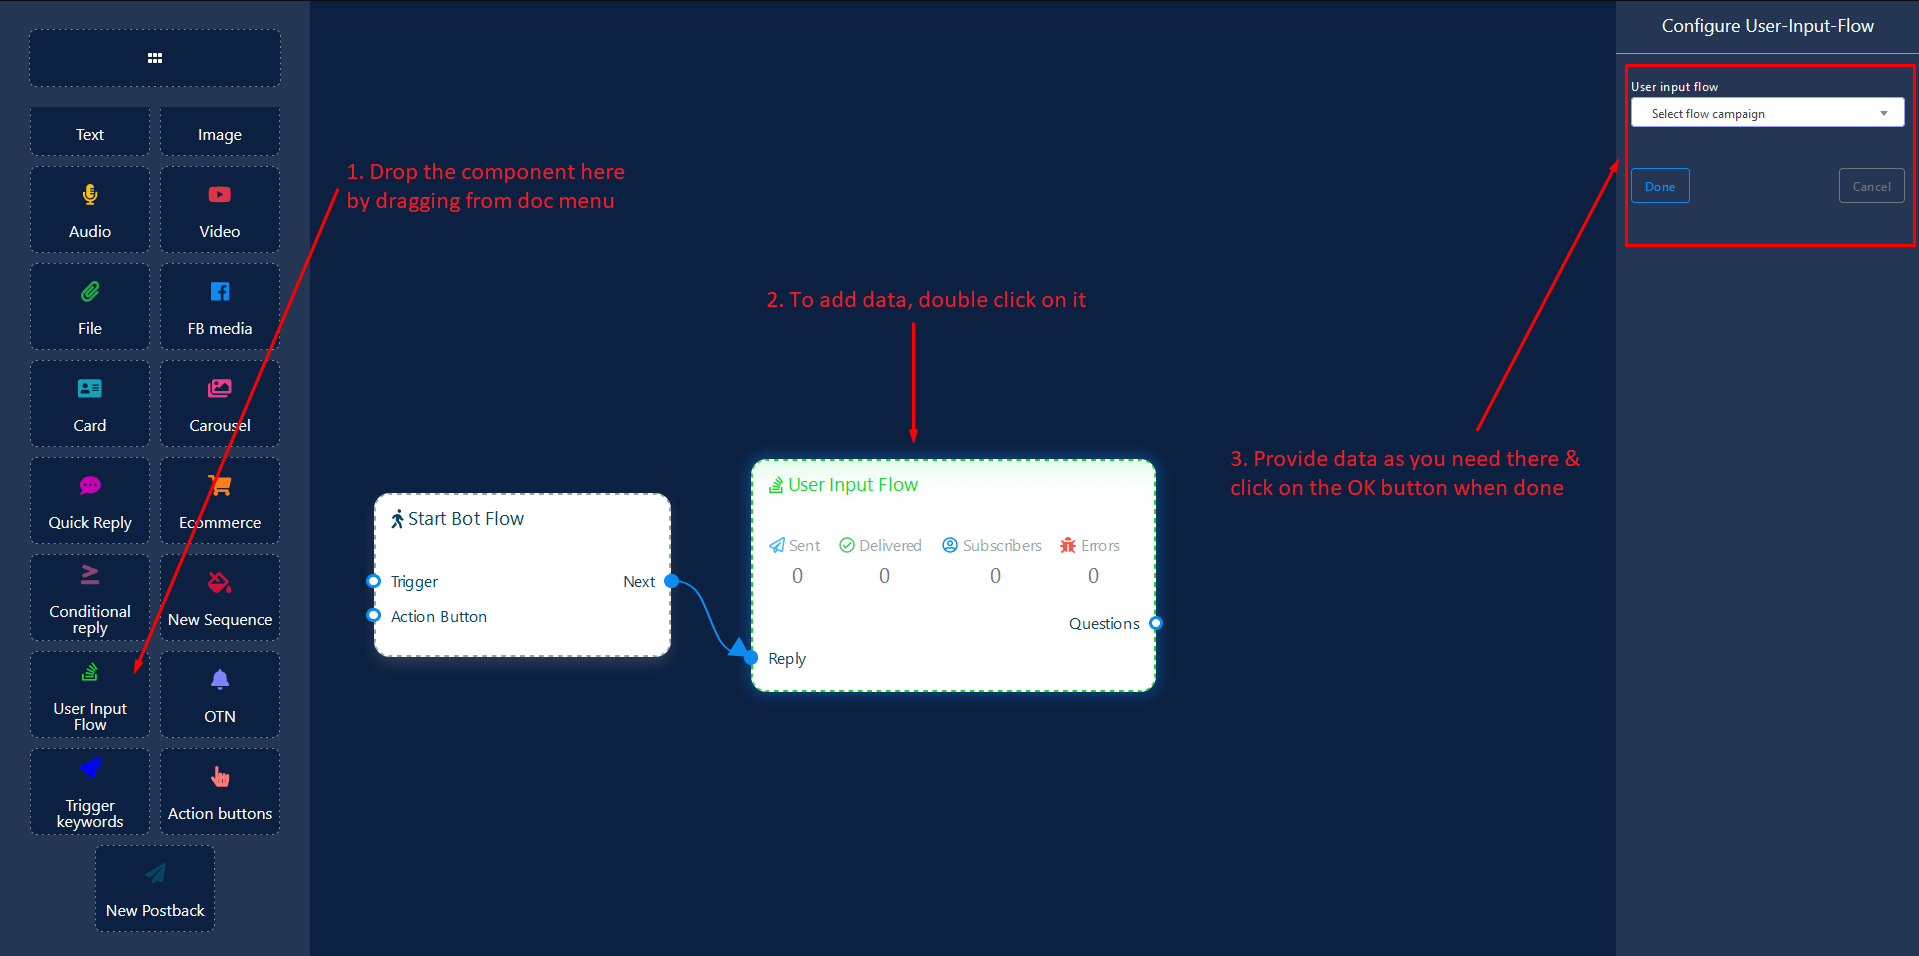
How to create
Let us see how we can create a reply using user-input-flow component.
Dragging and Dropping
From the dock menu, drag the UserInputFlow component and drop it on the editor at any place.
Adding Data
To add data to the UserInputFlow component, click twice on the body of the UserInputFlow component. It will open a sidebar on your right. Fill in the fields that you need.
E-commerce Component
E-commerce component will allow you to reply with referring an E-commerce shop and its products as a carousel or generic reply. It has 1 input socket and 2 output sockets.
- Input: Reply
- Output: Next, Quick Replies
Next or QuickReplies!?
There is a condition between Next and QuickReplies. Using either Next or QuickReplies, you can connect to other components. But you can't connect to others from both.
Connections
Reply may get connection from one of the following components:
- Start Bot Flow, New Postback, Text, Carousel, Facebook Media, Image, Video, Audio, File, E-commerce, Generic Template, OTN
Next may be connected to one of the following components:
- Text, Carousel, Facebook Media, Image, Video, Audio, File, E-commerce, User Input Flow, Generic Template, OTN
Quick Replies may be connected to the following component:
-
Quick Reply - you may connect up to 11 QuickReply components to the E-commerce component.
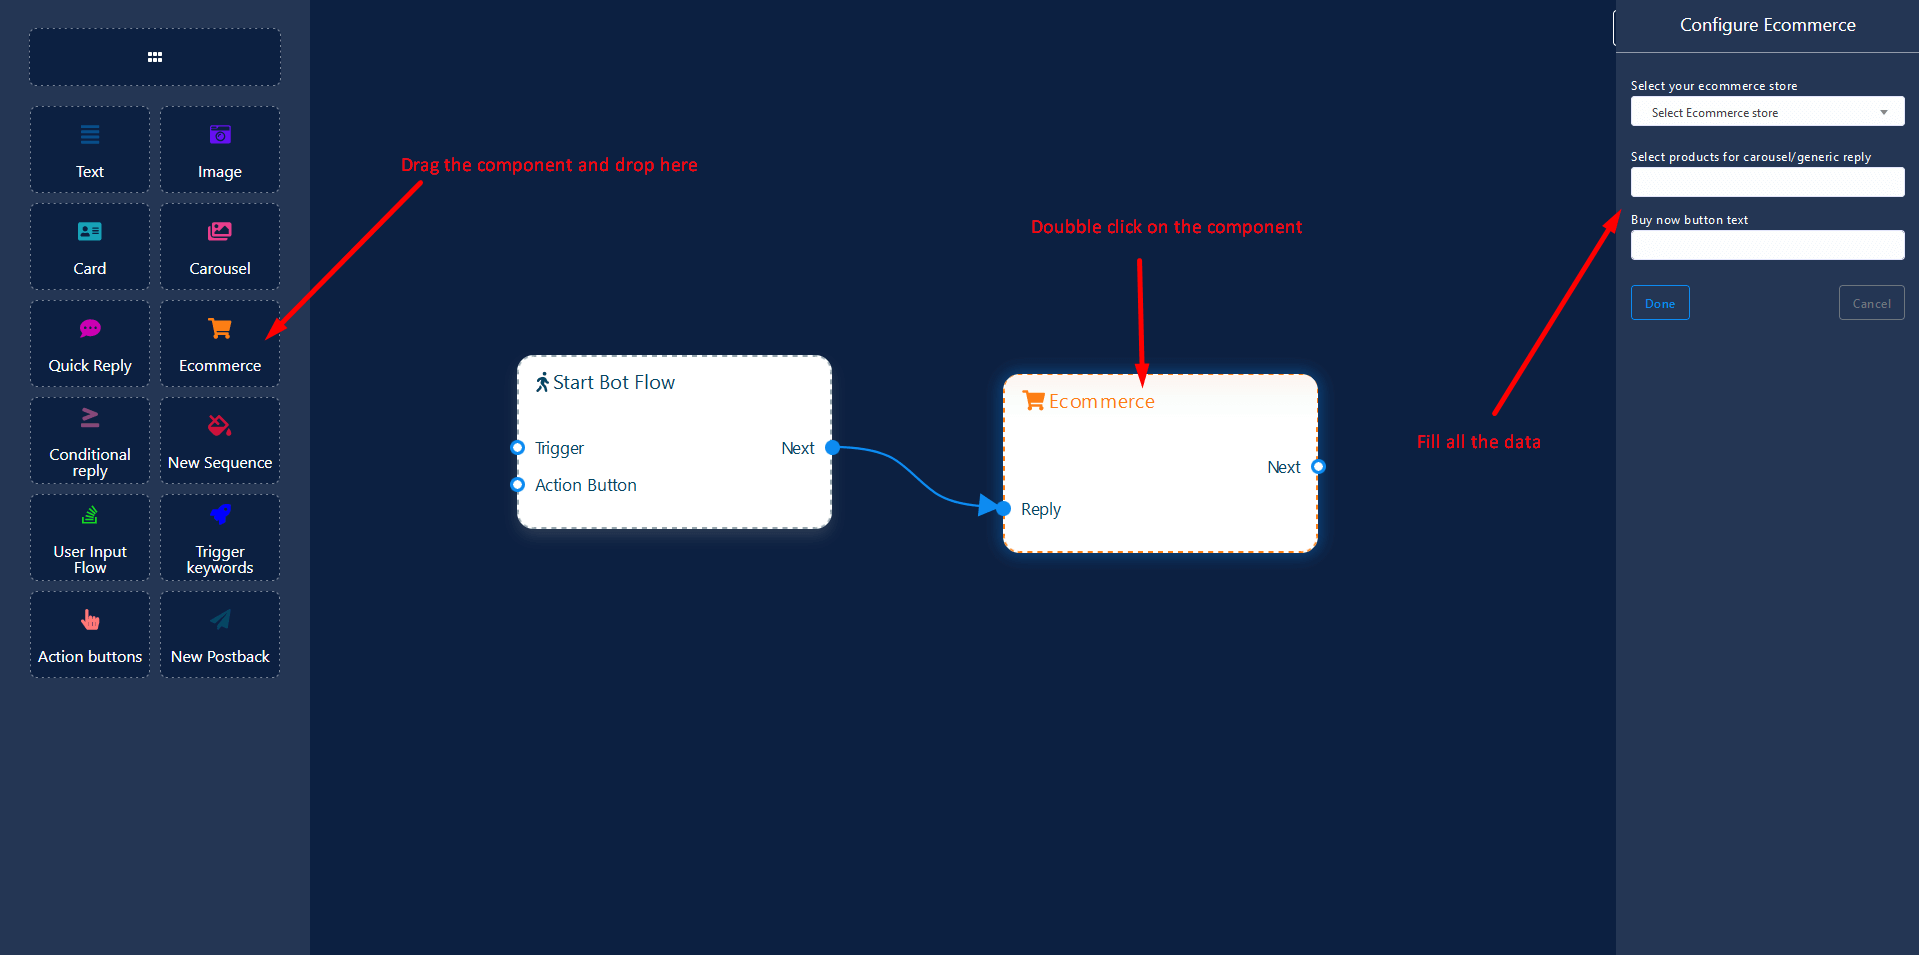
How to create
Let us see how we can create a quick-reply.
Dragging and Dropping
From the dock menu, drag the E-commerce component and drop it on the editor at any place.
Adding Data
To add data to the E-commerce component, click twice on the body of the E-commerce component. It will open a sidebar on your right. Fill in the fields that you need.
Delay in Reply
If you want to show the typing gif image on the bot or delay in replying, then you can use those fields.
Story mention template
In Instagram, a user can mention a story to anyone. And in the story,
the user can mention one more person. The moment you mention a story,
the story will be sent to the people whom you mention.
Well, if you create a story mention template in the Instagram chatbot,
the messages on the template will be sent whenever someone mentions you
in their stories.
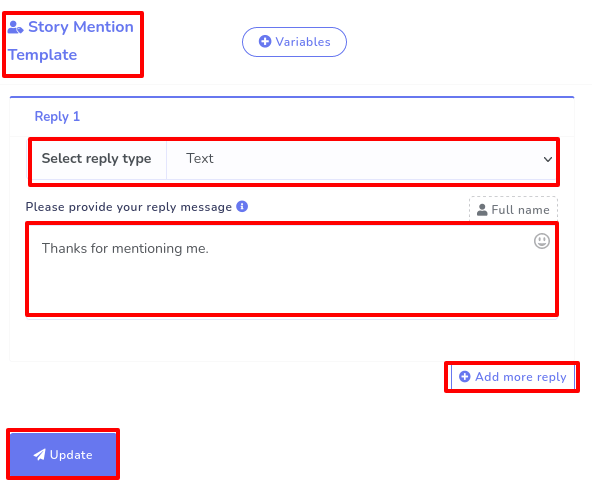
To create a story mention template, click on the action button settings
and a drop-down menu of two options-- No match template and story
mention template will appear. Click on the Story mention option and
instantly a form will appear. And you have to fill out the form. Okay,
fill out the form and click on the update button. The form is the same
as the Bot reply settings form.
If someone mentions you in their story, the message on the template will be sent automatically.
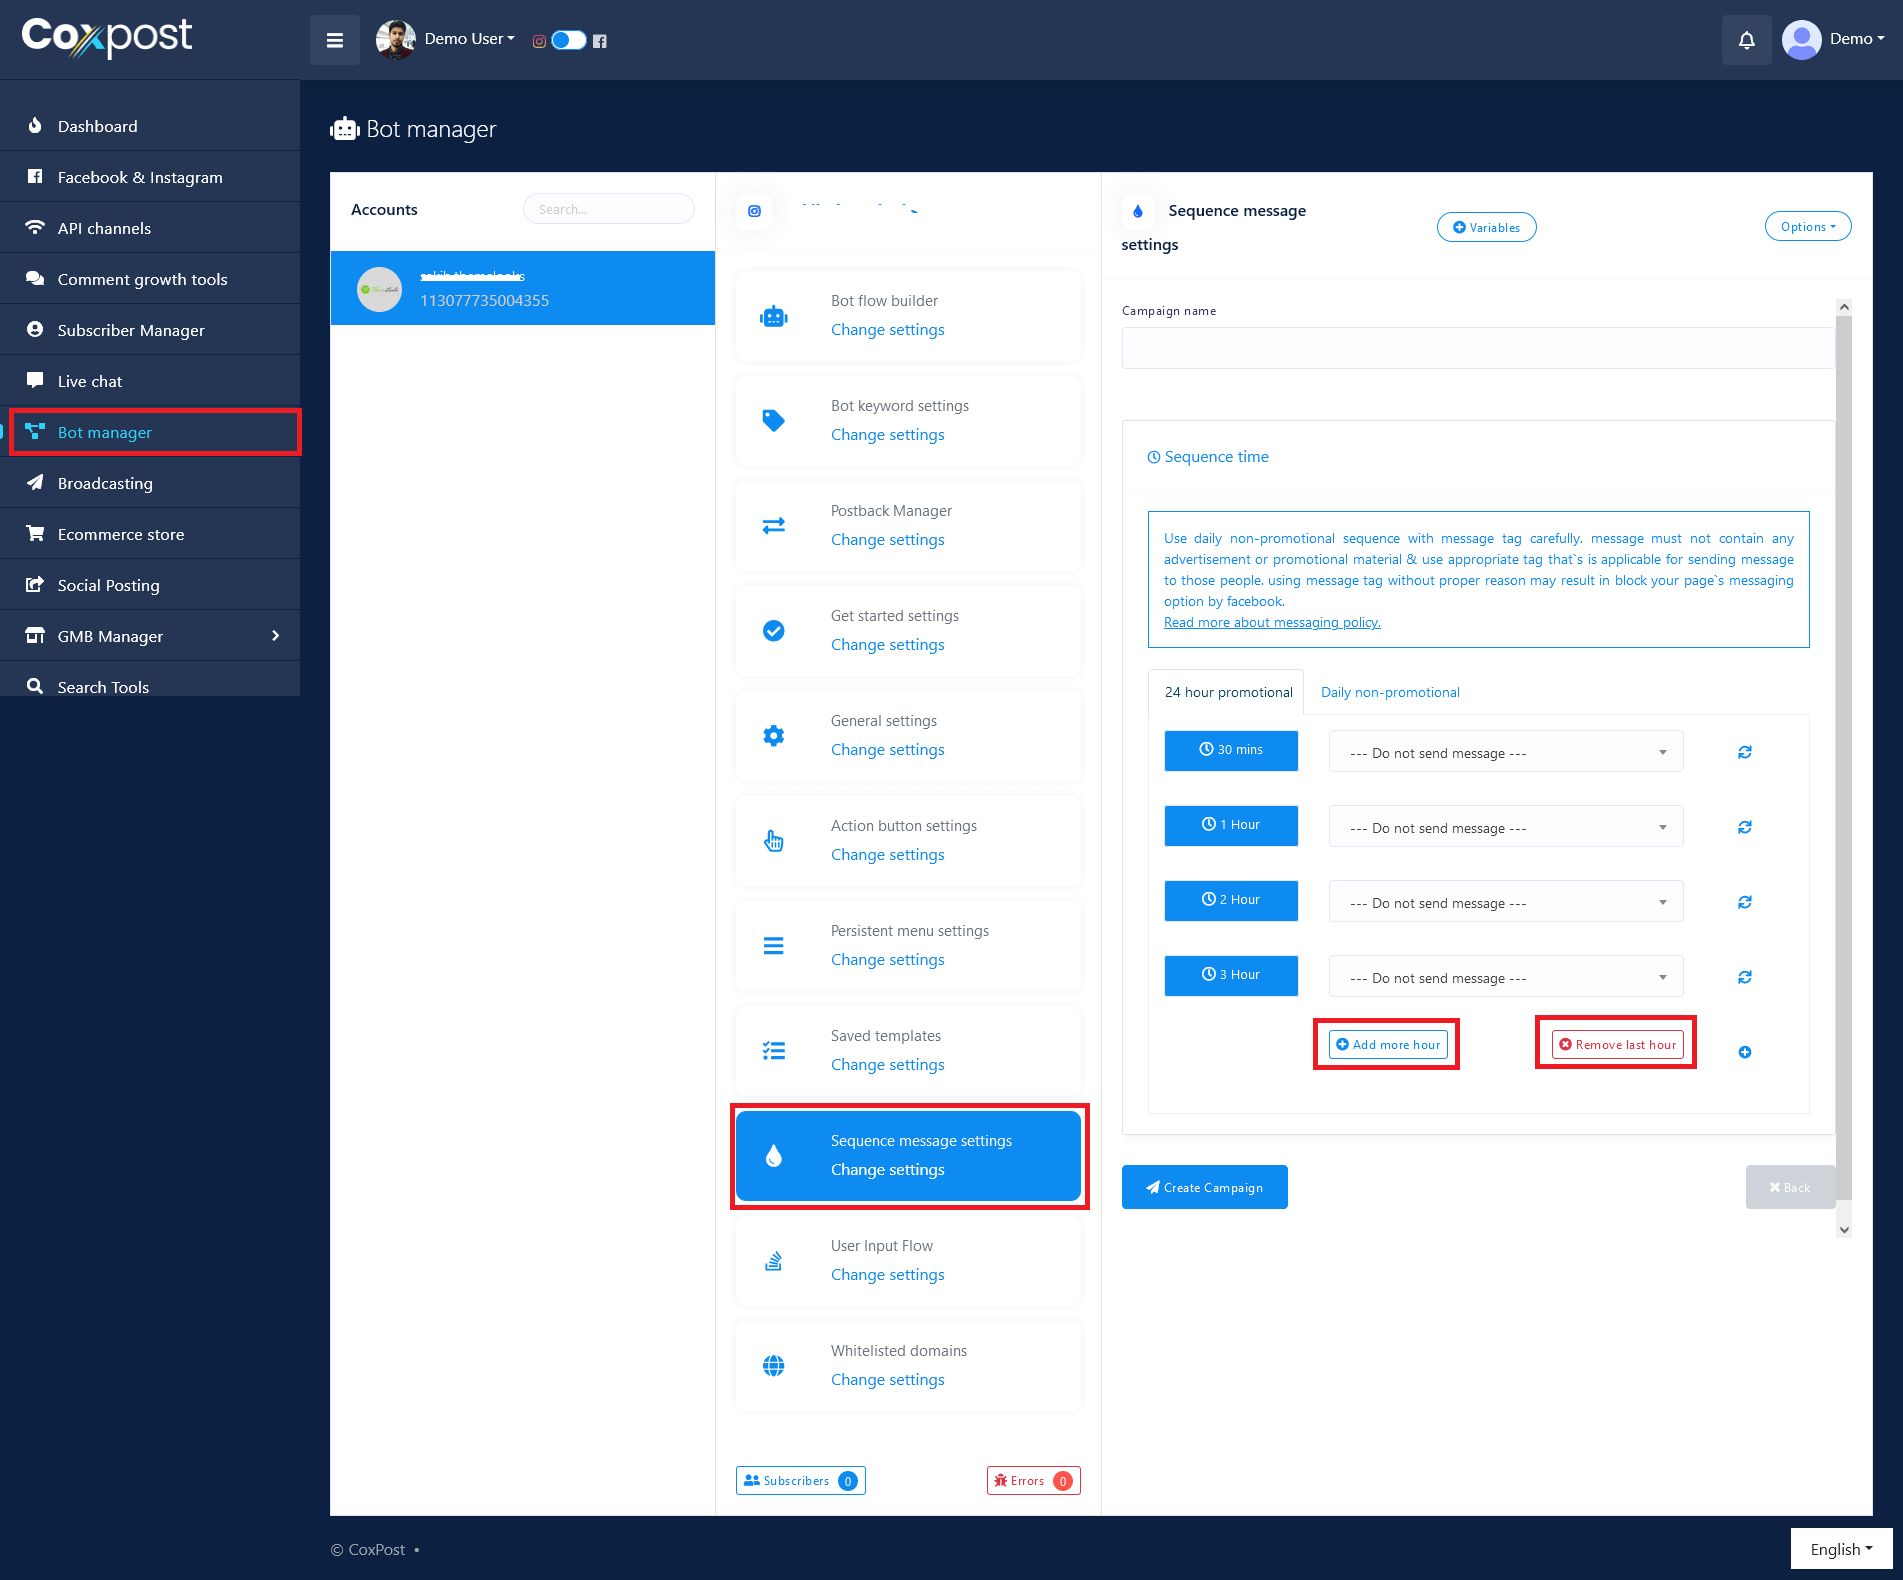
Sequence message
If you want to set Sequence message, click on the Sequence message settings option. Then click on the messenger sequence setting. Instantly, messenger sequence settings will appear. To add a sequence message, click on the add sequence button. Instantly, messenger sequence settings page will appear.
24-Hour Promotional
In the first field called campaign name, give your campaign a name. Note
that the sequence message is divided into two parts-- 24- hour
promotional and daily non-promotional. In the daily non-promotional,
messages can not contain any advertisement or promotional material. And
it is better if you read the instructions written in a box.
Well, to set 24 promotional messages, select the 24-hour promotional
option. And if you select 24 hour promotional, you will see a time table
in minutes and hours. To set message for a specific time, click on the
beside field and instantly a drop-down menu of different post-back will
appear. And if you want to add more time to the time table click on the
add more hour button. And if you want to remove the last time from the
time table click on the remove last hour button.
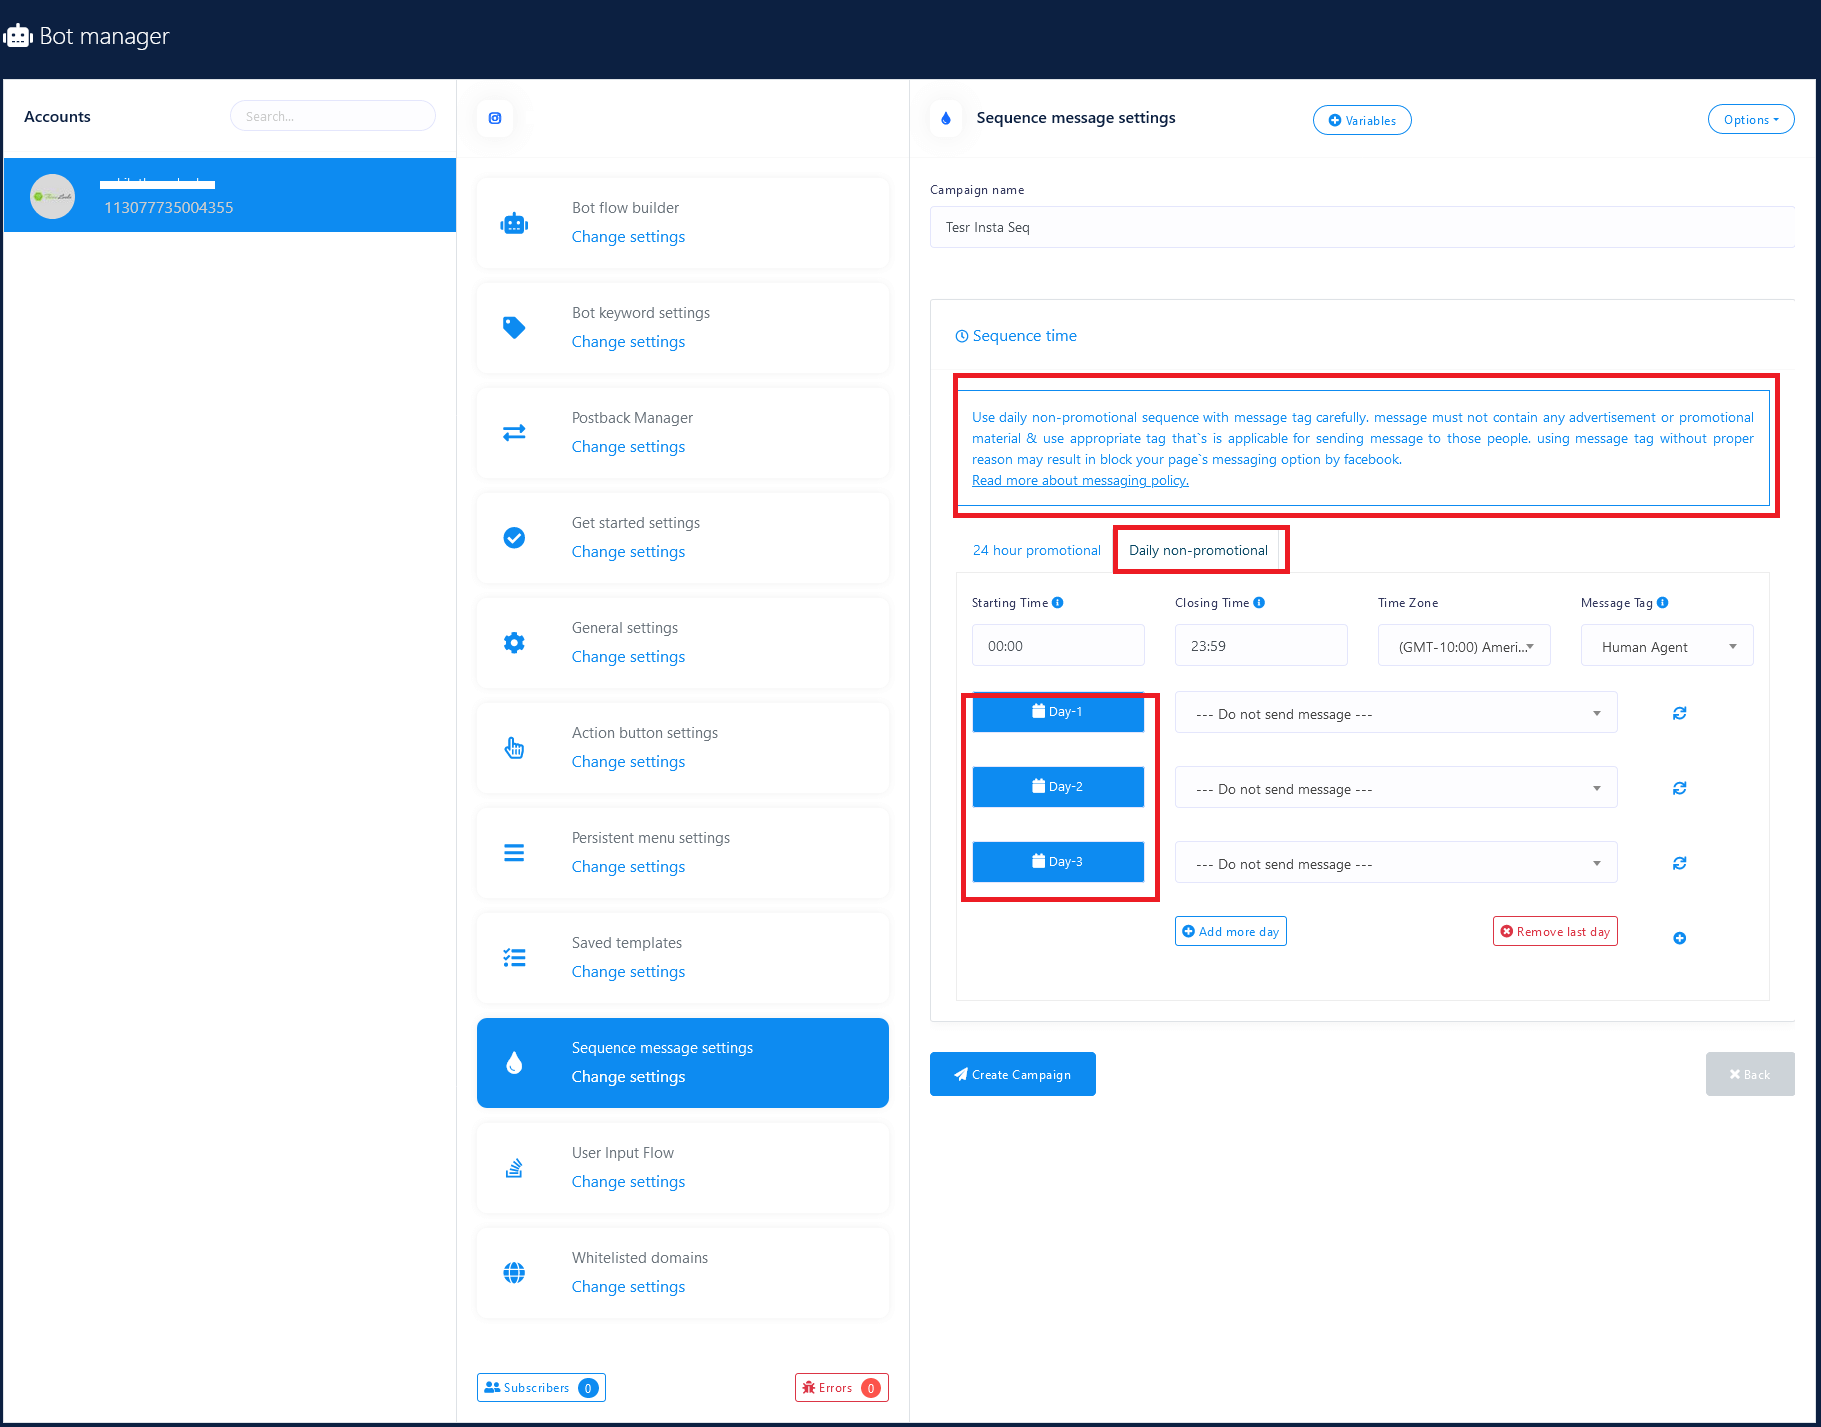
Daily Promotional
Well, now select daily non-promotional message, and a form to set daily
non-promotional messages will appear. Besides providing the messages,
you have to fill out some addition fields.
First, appear the Starting time fields. In this field, you have to set a
time. And from the time of the day, the system will start processing the
messages. Click on the tooltip button to know more about it.
Just as you click on the starting time field, a list of the different
times will appear. Now select a time.
In the closing time field, you also have to set a time. And the
processing of the message will be terminated at the time. That is, the
message will be sent between the starting and closing hours.
Then you will see a time zone field. In this field, you have to select
your time zone. Click on the time zone field and a list of different
time zones will appear. And from the list, select your time zone, so
that the system can detect your local time.
Then you will see a field called message tag. In this field, the human
tag is already selected and it is the only option. Click on the tooltip
button to learn about the option.
After that, you will see a time table of Day 1, Day 2, Day 3. And next
to the days, you will see fields with Do not send message option
selected. That is, no message is selected yet. Now you have to select
the message you want to send. Now click on the field and a drop-down
menu of different predefined post-back will appear. And you have to
select a post-back that holds the message that you want to send.
If you want to add a day to the list, click on the add more day button.
On the other hand, if you want to remove a day from the list and click
on the red-colored remove last day button and the last day of the list
will be removed.
Now click on the create campaign button, you will see a success message.
That is, the sequence messages has been created.
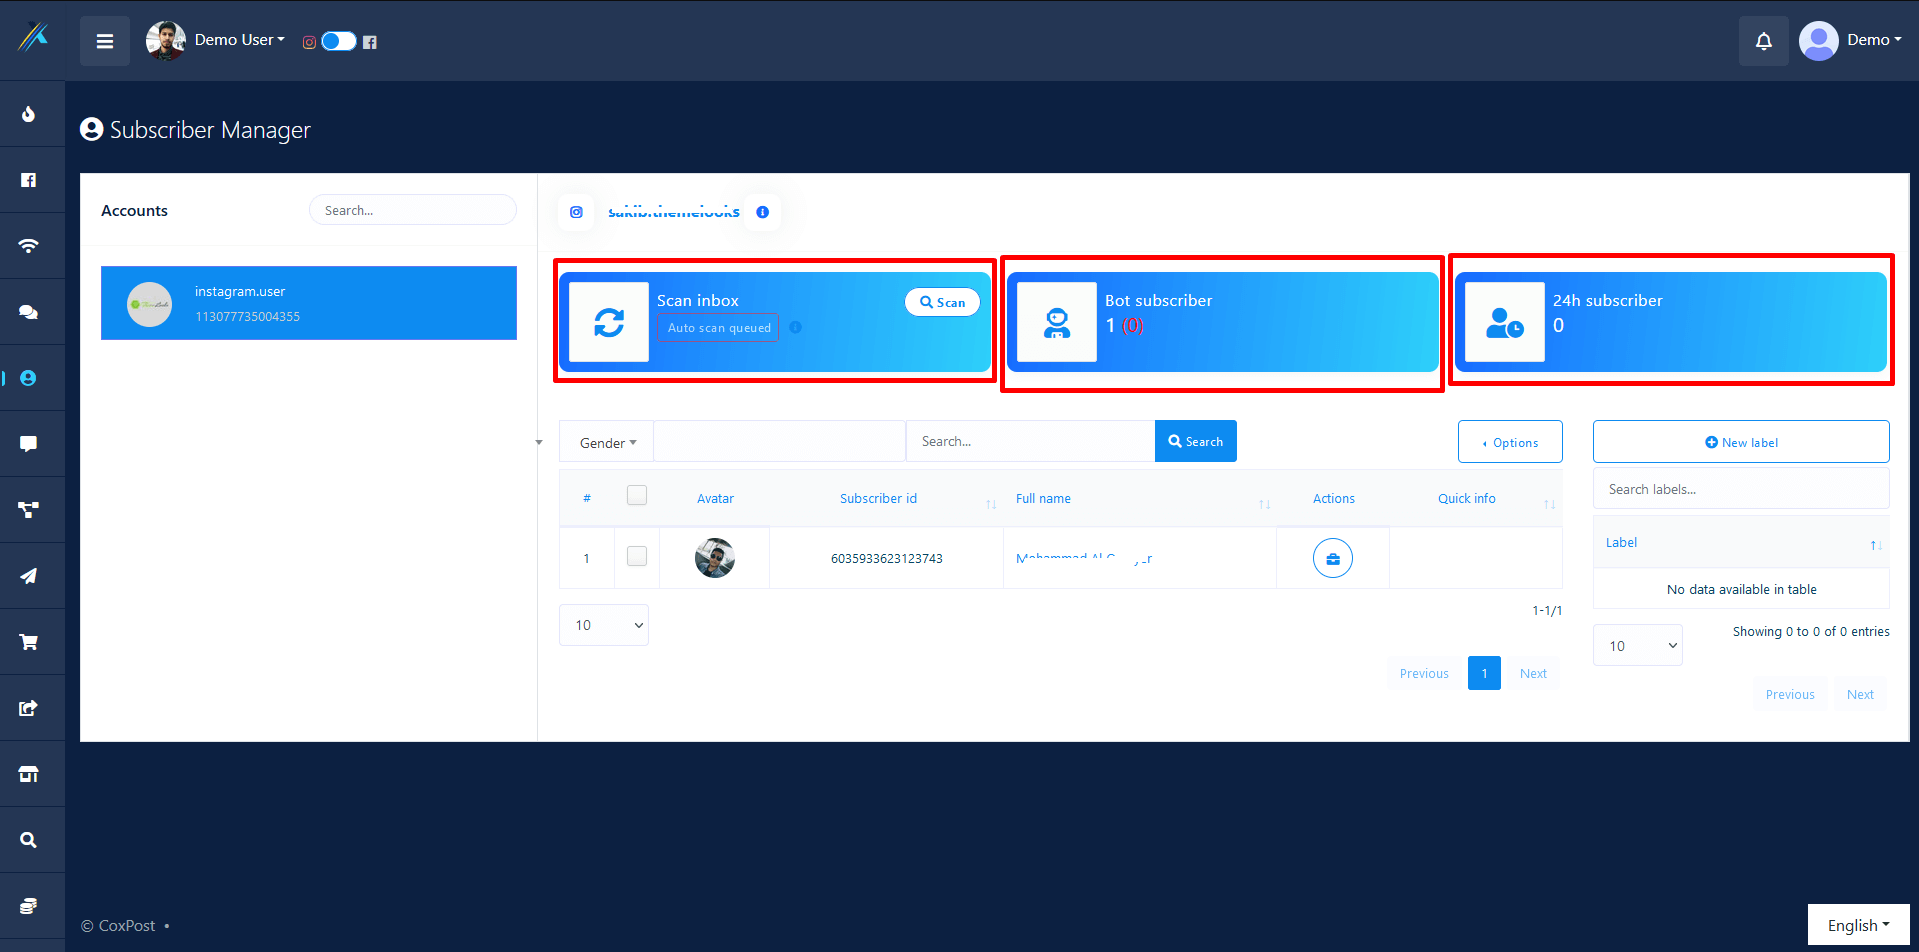
Subscriber Manager
Subscriber manager is also attached with the Instagram chatbot feature.
Click on the Subscriber manager at the left sidebar of Dashboard.
Instantly, will appear a page divided into two sections-- Messenger
subscriber and SMS/Email subscriber(External). In the Messenger
subscriber option, you will see three options-- sync subscriber, bot
subscribers, and label/tags.

Sync Subscribers
First, click on the sync subscribers’ Instagram button, and instantly,
the sync subscriber page of Instagram profile will appear. In the pages
section, you have to select an Instagram profile first. Here, you will
see the statistics and other things on the Facebook page you selected.
But if you want to see these things of your Instagram profile, select
the radio button with the same name as your Instagram profile.
In the conversation subscriber box, you can see how many users have
conversations with your Instagram profile.
In the bot subscriber box, you can see how many people have
conversations with the bot you set with the Instagram profile.
In the unsubscribed box, you can see how many users have unsubscribed
your bot.
In the 24h interaction box, you can see how man users have interacted
with your Instagram profile in the last 24 hours.
In the migrated bot subscriber, you can see the subscribers has been
migrated.
Then you will see a row of four options-- subscriber list, scan page
inbox, background scanning, latest conversation.
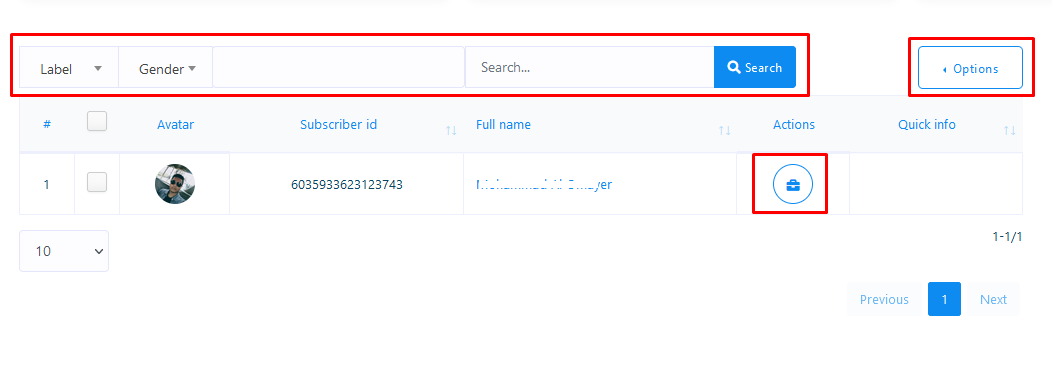
In the subscriber list option, you can see the list of the subscribers of your Instagram profile. Click on the see list button of the subscriber list option and instantly, subscribers list will appear in a modal box.
By clicking on the unsubscribe button next to a user’s name, you can
easily unsubscribe the user.
At the right top corner of the modal box, you will see a button called
option. Click on the options button, and will appear a menu of three
options-- assign a label, download the full list, migrate full list to
the bot.
With the assign label, you can assign subscribers into a label. First,
select the name of the subscribers you want to assign to the label.

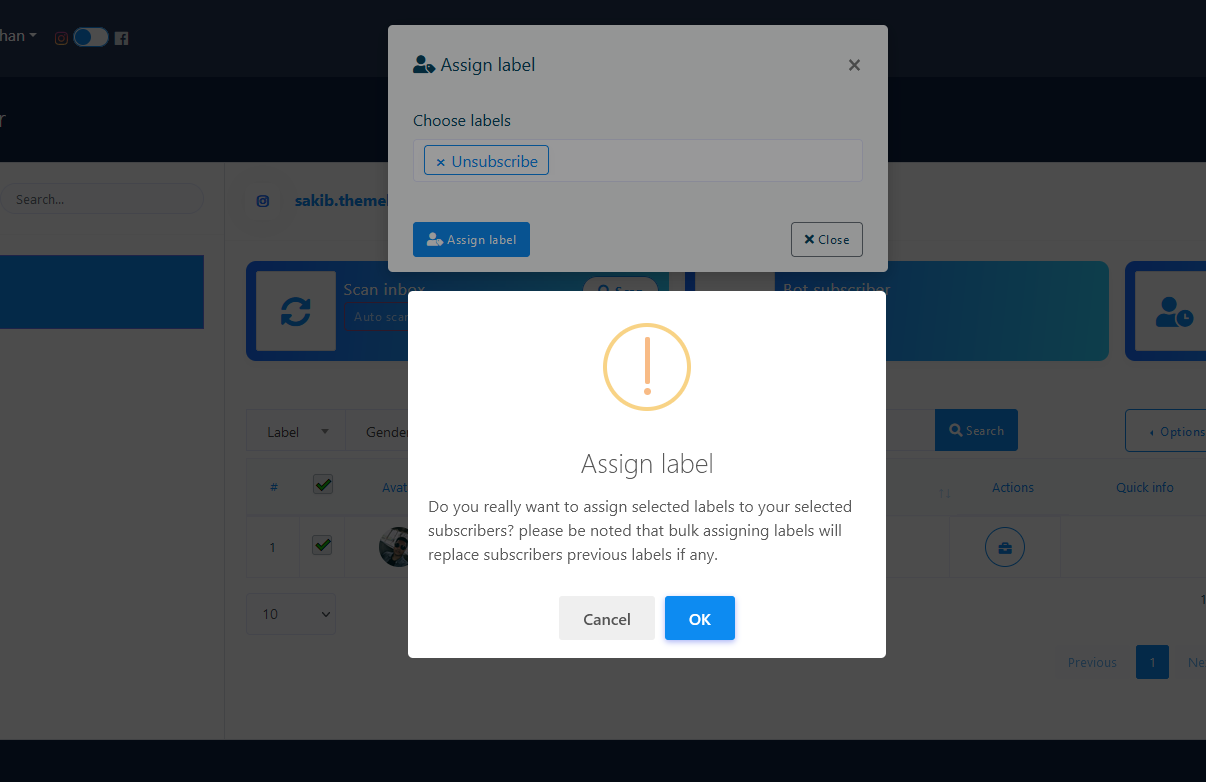
And then click on the assign label option and a modal form called assign label will appear. Now click on the choose label fields and instantly a drop-down menu of different labels will appear. Now select your desired label and click on the assign label button. Instantly, a warning message will appear. It will warn you what really will happen in the background. Still, if you want to assign a label, click on the ok button.

If you want to download the full list of the subscribers, click on the download full list button. Instantly, the full list will be downloaded as the CSV file.
You can also migrate the full list as a bot subscriber. Now click on the
Migrate full list to bot option and a warning box will appear to check
if you click on the option accidentally. Now click on the ok button of
the warning box and a migration successful message will appear.
If you want to scan your Instagram profile conversation and import them
as subscribers, click on the scan now button of the Scan page inbox.
Instantly, a modal form will appear. To know more about the scan page
inbox, click on the tooltip button of the scan the latest fields. Now
click on the field and a drop-down list of different numbers of
subscribers will appear. Now select your desired option and click on the
start scanning button. And after the conversations are imported as the
bot subscribers, you will see a successful message. That is, the
conversations have been imported as the bot subscribers.
If you want to enable background scanning, click on the enable button. To know more about background scanning, click on the tooltip button. Also, you can see the latest conversations of your page. Now click on the details button, a new page will appear on another tab of your browser. Here you can see the latest conversation. Besides, you can converse with the users from here. That is, the page works as the Instagram messenger. This feature is useful because if a user wants to chat with a human instead of a bot, you can talk with the user here without going to the Instagram messenger.

Bot subscribers
Now come to the bot subscriber option. Now click on the actions button of the bot subscriber and instantly, the bot subscriber page will appear. Here you have to select the Instagram profile to see the subscribers of the bot set with the profile. Under Facebook, you will see the Facebook pages and under Instagram, you will see the Instagram profile. From here, select the Instagram profile you want to see the subscribers of the bot set with the Instagram Profile. You can see the subscriber list Gender wise and label-wise. If you select a label, you will see the subscribers of the bot stored in the label.

Also, you can search a subscribers in the search box.
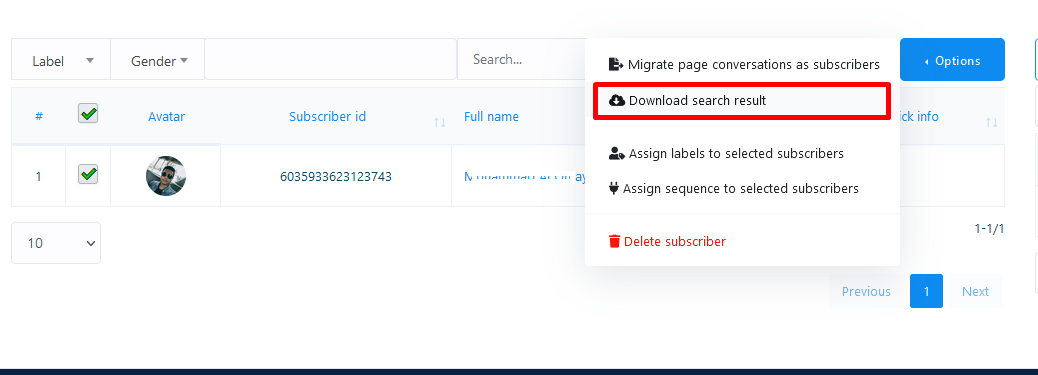
Now click on the options button at the right up corner of the modal box.
And instantly will appear a list of three options-- Download result,
assign label and delete a subscriber. Click on the download result
option to download the list of the bot subscribers in a CSV file.
You can also assign subscribers to label. To do this, first select the
subscriber or subscribers you want to assign to a specific label, and
click on the assign label option of the drop-down menu. Instantly, a
modal form will appear. Now click on the choose label field of the modal
box and a drop-down menu of different predefined labels will appear.
That is, you have to create a label first. Well, now select the label
where you want to assign the subscribers you already selected. Now click
on the assign label button and a warning message about what will happen
in the background. Still, if you want to assign subscribers to the
label, click on the ok button. Now you will see a successful message.
That is, the selected subscribers have been assigned to the label.

Also, you can delete subscribers. To delete subscribers, first select the subscribers you want to delete and click on the delete subscribers option.
Label/Tags
Now come to the label/tag option. Now click on the actions button of the label/tag option and instantly, the label/tags page will appear. Now just click on the new label button and instantly will appear a modal form with two fields-- label name and page name. In the label name field, provide a name for the label and in the page name field, you have to select your Instagram Profile

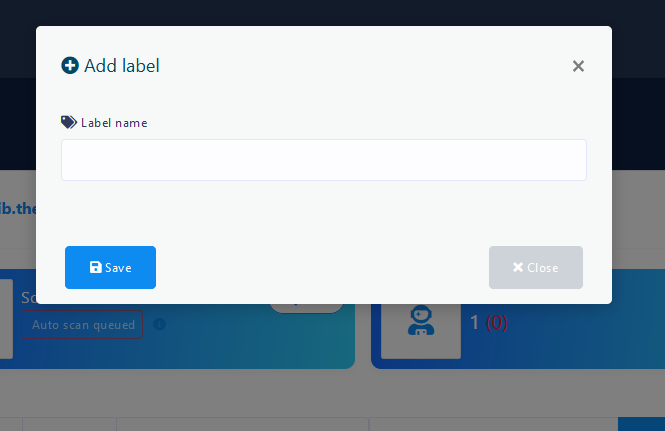
Well, now click on the label name field and write a name for the label. Then click on the page name field, instantly will appear a drop-down menu of Facebook pages and Instagram Profile. Select an Instagram profile for which you want to make the label. Now click on the save button and a successful message will appear at the bottom of the page.

The label will only work for the Instagram profile you selected.
E-commerce Store
E-commerce store is a
special feature of CoxPost, the world’s best marketing software. With
the feature, you can generate a virtual restaurant that will be opened
both inside the Facebook Messenger and on the browser.
Just after creating your virtual restaurant, it will provide you two QR
codes-- Messenger QR code and browser QR code. You just have to supply
the QR codes to your customers. Just as your customers scan the
Messenger QR code, straightway, your virtual shop opens inside your
messenger. Likewise, just as they scan the browser QR code, your virtual
shop will open on their browsers. Because of the QR codes, your
customers will get rid of finding your Facebook page, sending messages,
and entering your virtual restaurant’s link on their browsers.
Besides, the virtual restaurant will provide two urls under the QR
codes-- Messenger url and browser url. Just like QR codes, Messenger url
will be open inside the messenger and browser url will be open on the
browser.
Generate virtual restaurant
First, you have to create a store for your virtual restaurant and add
food items to the store. Then you have to make some settings so that
your virtual restaurant works properly.
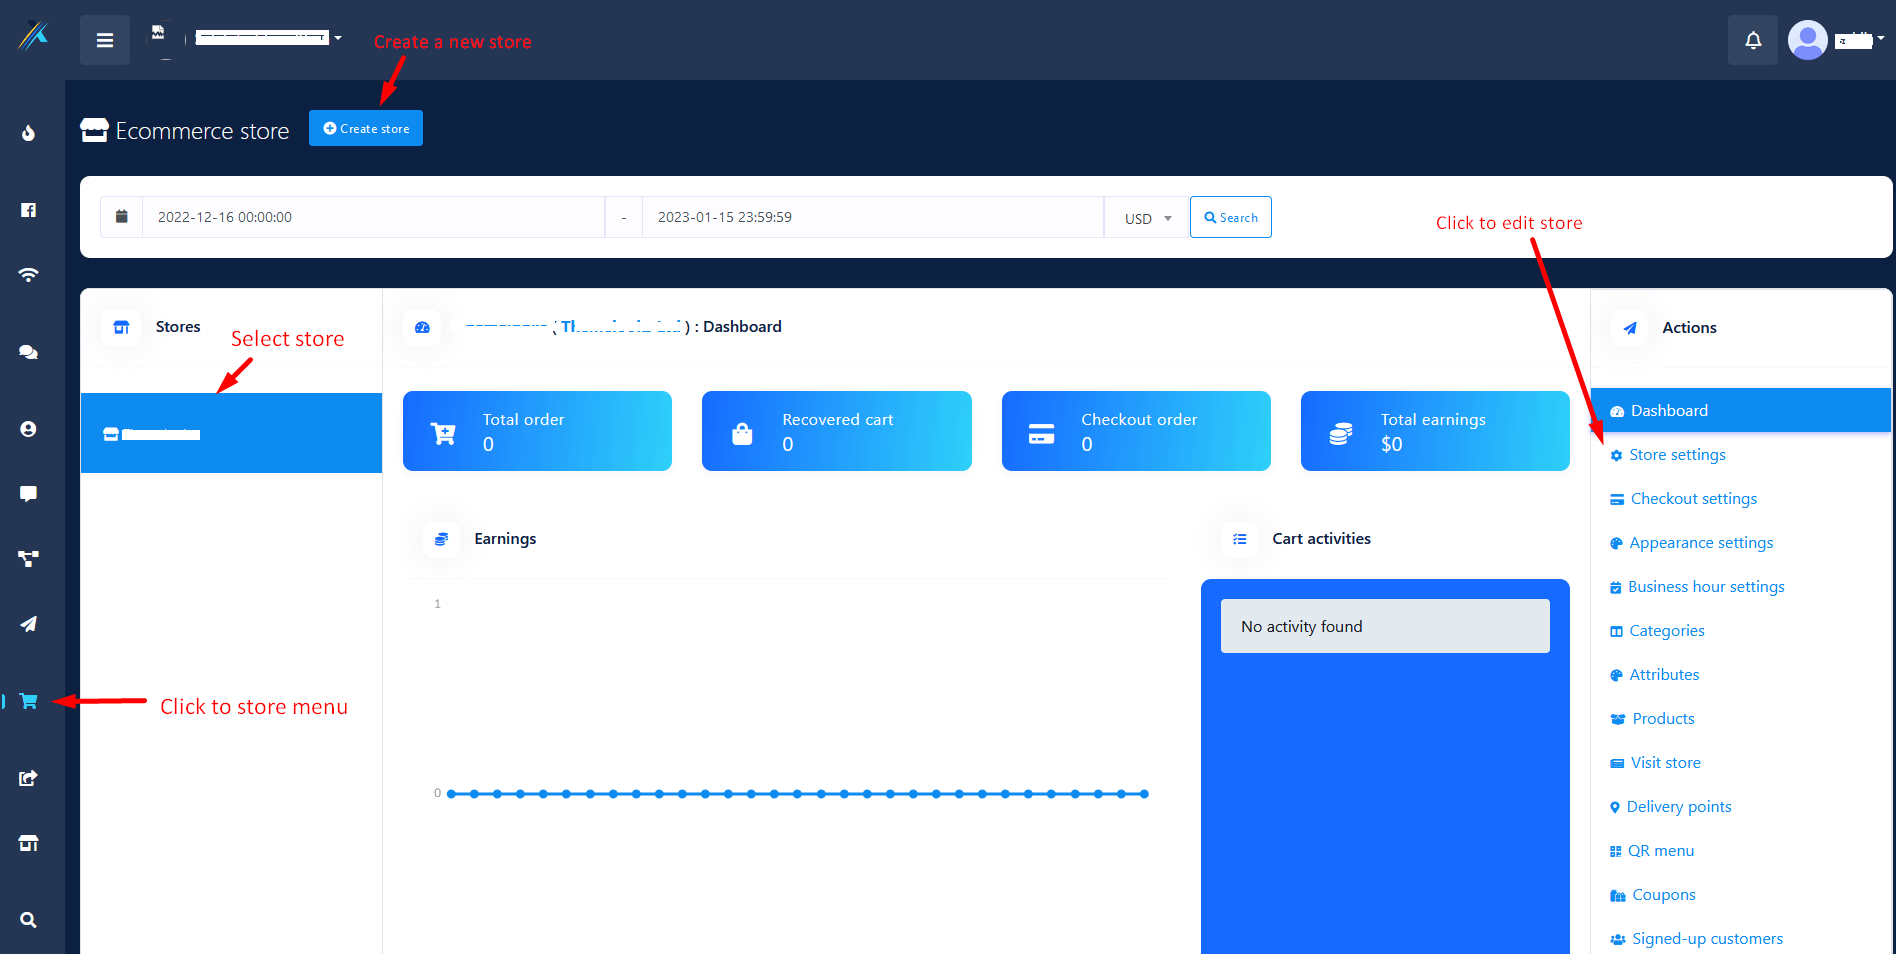
To create a store, go to the left panel of
the CoxPost Dashboard > click on the 'E-commerce store'
menu.

Just as you click on the E-commerce store the interface of the E-commerce store will appear with a Create store button at the top of the page. And other existing stores listed will appear under the ‘Store’ menu on the left side. After selecting any existing store, you can add more products to the specific store and edit settings.
Create new and edit existing store
Well, to create a new store, you have to click on the Create store button first.
Instantly, a form will appear. You have to fill out the form-- selecting
a Facebook Page, providing some initial information about the virtual
restaurant, writing down the Terms of service and refund policy, and
uploading the logo and favicon.
In the form, there is a special box called local that needs a bit of
explanation. Just as you click on the box, a drop-down menu of some
languages will appear-- you can select any language. Your virtual
restaurant will open in the language that you select. For example, if
you select English, your virtual restaurant will appear to your
customers in English.
There are two boxes called, ‘Facebook Pixel Id’ and ‘Google Analytics
Id’ that also need a bit of explanation.
Facebook Pixel Id is a piece of code you can place inside the source
code of your website. The code automatically can collect and store data
of your website visitors. Because of Facebook Pixel code, you can run
Facebook Ads for targeted audiences who have visited your website before
using the data. Please visit the link to see how to create Facebook Pixel
Id.
Google Analytics Id also works like Facebook Pixel Id to re-target your
website visitors in the Google ads. Please visit the link to learn how to create Google
Analytic Id.
Anyway, after filling out the form, click on the Create store button at the bottom of
the form. If you fill up every compulsory field properly, a pop-up box
will appear with a successful message.
Add Category
Now you have to add some categories to your store so that you can add food items in different categories. The category is an important thing to arrange your food items. If your food items are organized properly, your clients can look over different food items and choose from them easily. To add a category, click on the option called ‘Categories’ in the ‘Action menu’ at the right side of the Dashboard. Instantly, a page will appear with the Add category button at the top-right of the page.
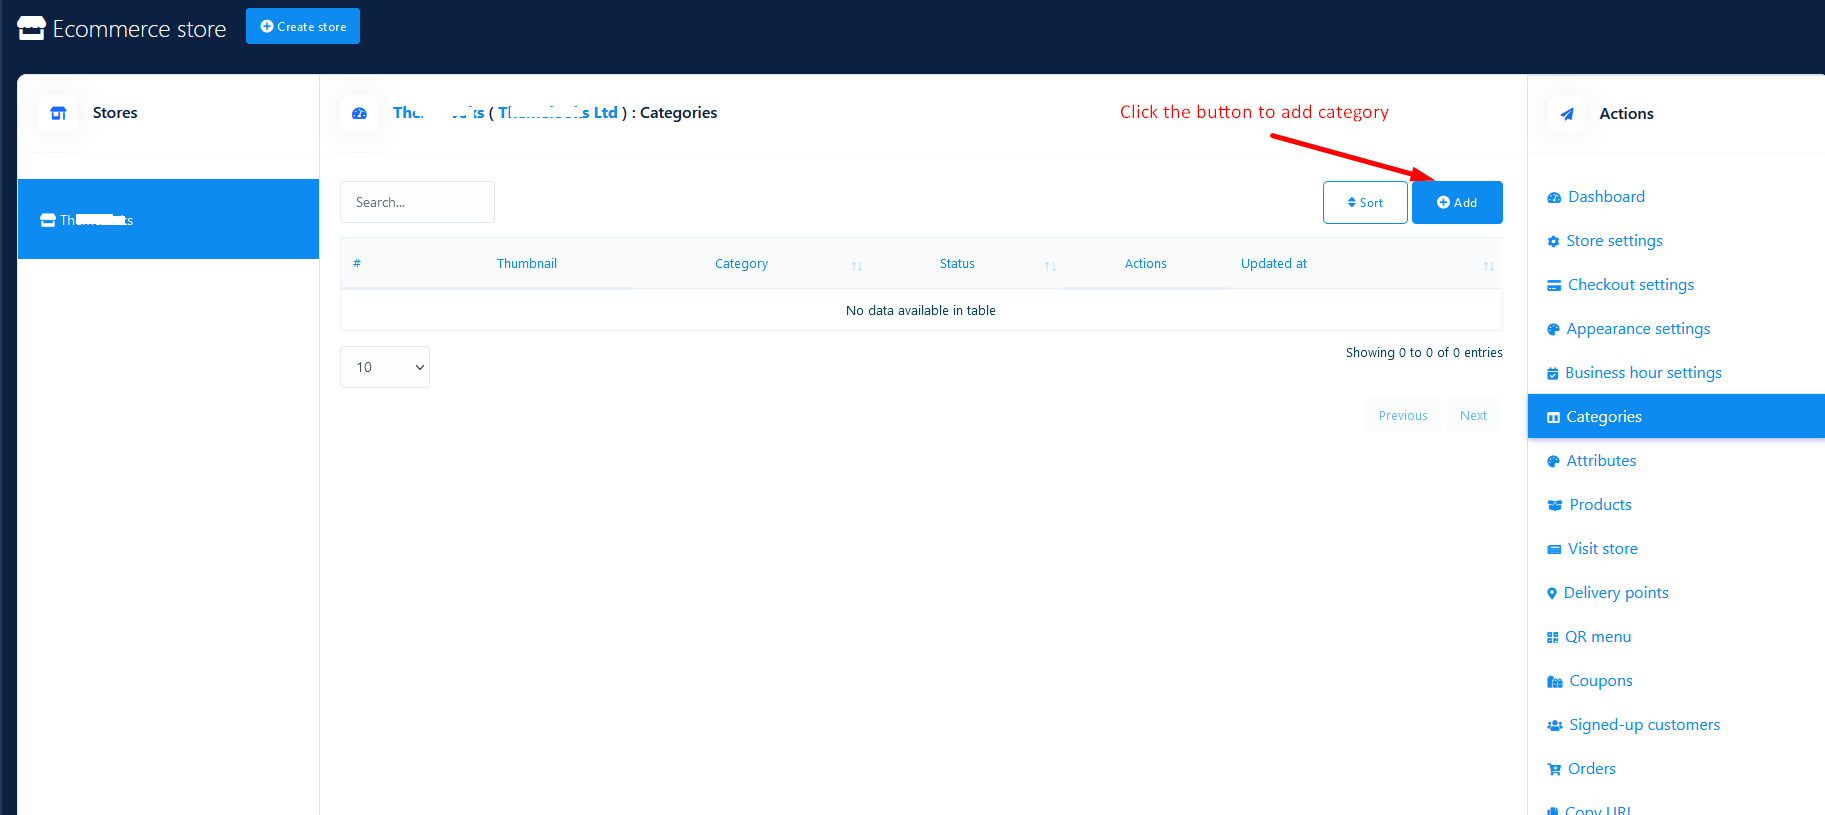
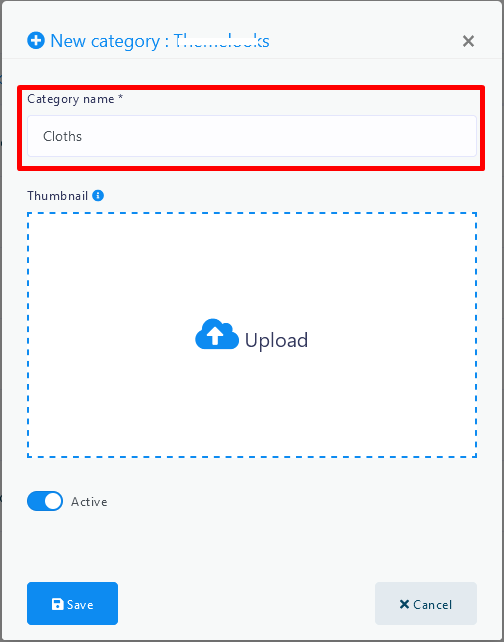
Click on Add Category > write down the
category name > Click on the ‘Save’ button.
Now click on the Add Category
button and straightaway, a pop-up form will appear. You have to fill out
the form— writing down a Category name. Then click on the Save button. Now this category
has been added to your store.
Of course, you can add as many categories as you want. And all your categories with edit and Delete buttons will be listed on ‘Categories’ page. By clicking on the edit edit and delete delete button, you can edit and delete the category. You can also see the status of the category-- whether a category is active or not.
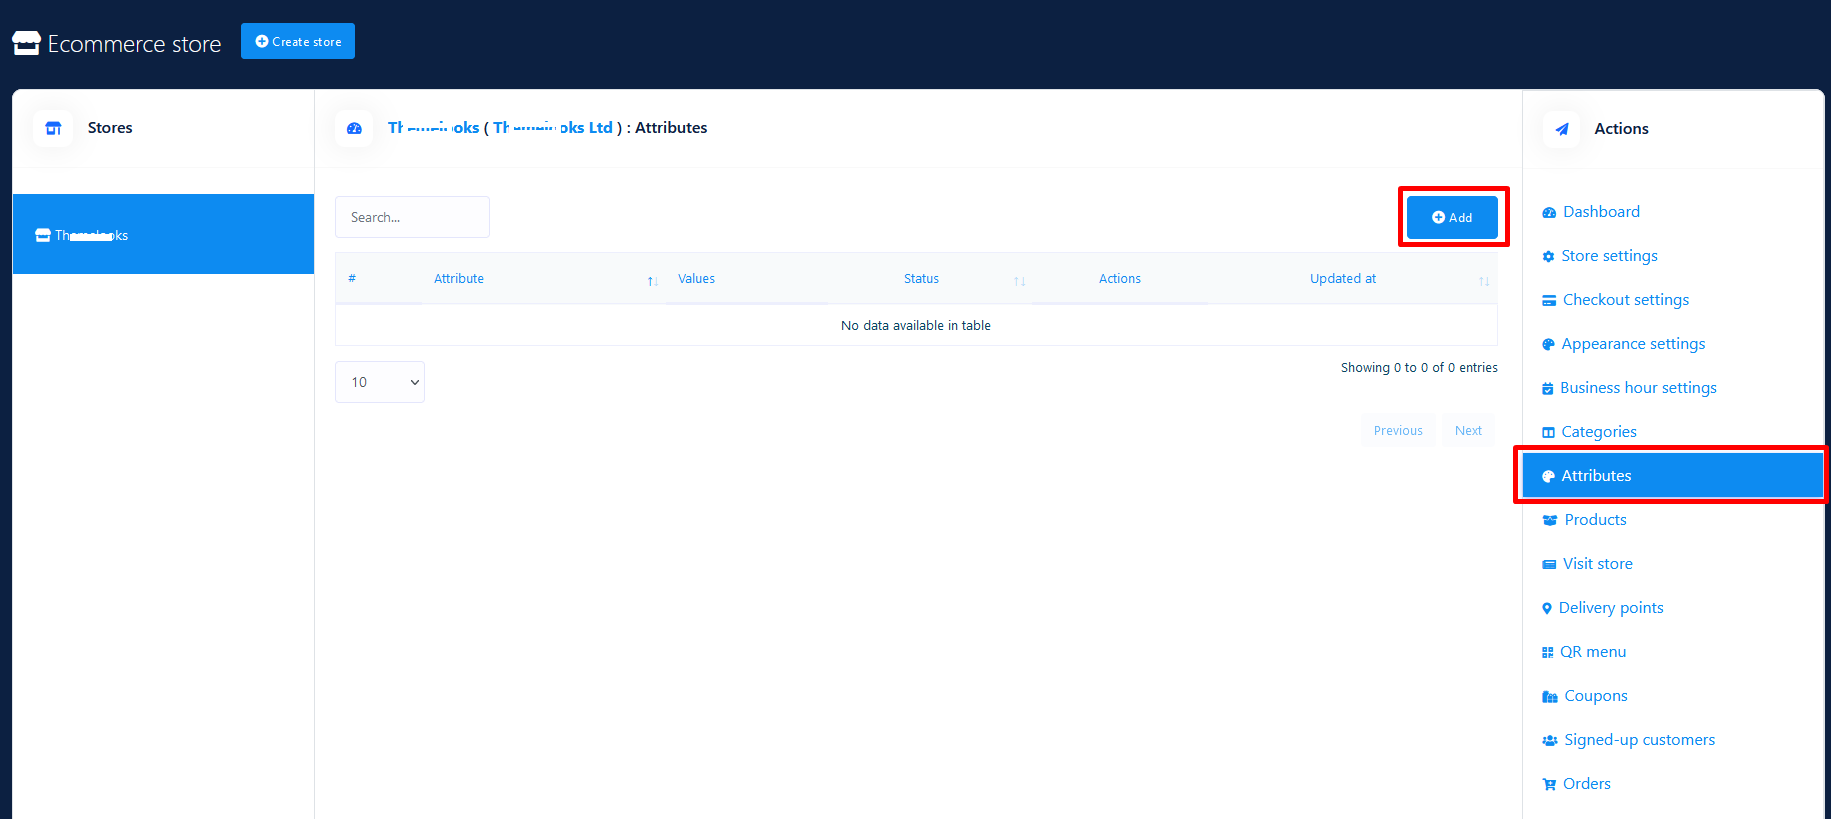
Add Attribute
To add the attribute, click on Attributes
> Add Attribute > write down Attribute Name > provide
Attribute Value > Enable or Disable two radio buttons as you see
fit > Save.
Just as you click on the Attributes option in the Action menu at the
left side of the dashboard, a page called ‘Attributes’ will appear with
the ‘Add attribute’ button at the top-right of the page.
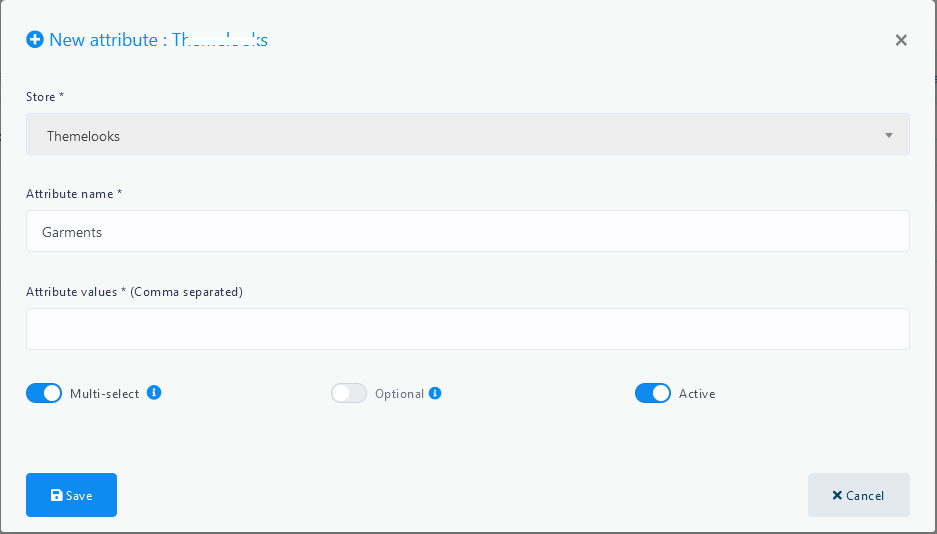
Now click on the Add attribute
button and a pop-up box will appear. In the box, you have to write down
the name of the attribute and give attribute values in comma-separated.
Then enable or disable three buttons called ‘Multi select’, ‘Optional’,
and ‘Active’ as you see fit for the attribute.
By the Active button, you can
make the attribute Active or Inactive. The functionalities of the other
two buttons are a bit complicated to understand. If you enable the Multi-select button, your clients
can select the multiple attribute values of the same food item. If you
add an attribute called ‘Pizza toppings’ and add three values like
‘Extra Chilly’, ‘Extra spice’ and ‘Extra cheese’ and turn on a
multi-select button, your customers can order a Pizza that has Extra
Chilly, Extra spice, and Extra cheese at the same time.
On the other hand, if you disable the Multi-select button, a client can
only one attribute value for a specific food item. For example, if you
disable ‘Multi-select’ for an attribute called ‘pizza toppings’ with
three values called ‘Extra Chilly’, ‘Extra spice’, and ‘Extra cheese’ a
client can only order a pizza either with extra chilly, extra spice or
extra cheese.
As for the multi-select button, you have to keep in mind that you can’t
enable the multi-select button for the attributes like ‘Size’ because a
food item can’t be small, medium, and large at the same time-- it is not
logically possible. But you can enable the multi-select button for the
attributes like toppings because toppings can have Extra Chilly, Extra
Spice, and Extra Cheese at the same time. Moreover, for attributes like
pizza toppings enabling the multi-select button is useful because then
customers can order a pizza that has extra Chilly, extra spice, and
extra cheese in the toppings at the same time.
On the other hand, if you turn on the Optional button, your clients can
avoid selecting attributes for a specific food item. Then the clients
can order specific food items that have no additional ingredients. For
example, if you enable the Optional button for ‘Pizza
toppings’, a client can order a pizza with toppings that has no extra
ingredients.
But if you disable the ‘Optional’ button, the clients must choose an
attribute. Otherwise, he/she can’t order the food item. Disabling the
‘Optional’ button is required for attributes like size, for a client
must select a value for size whether it is small, medium or large.
Otherwise, they can’t order a food item.
Then comes the ‘Active’ button. If you turn on the active button, the
attribute will appear when you add a food item to the store and
otherwise not.
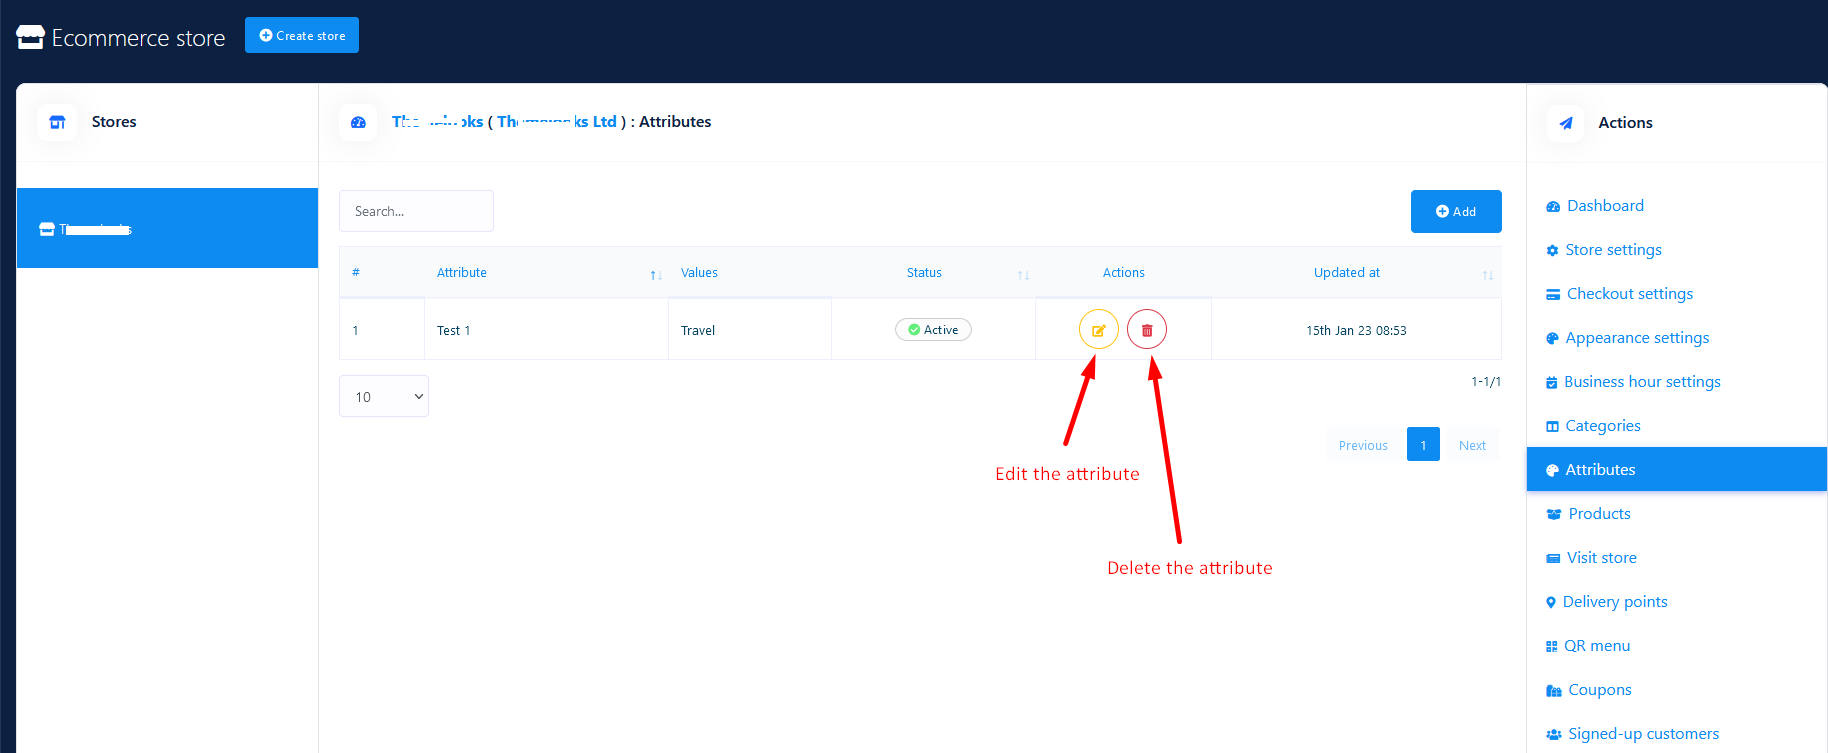
Like the Category option, after you have added one or more attributes,
the attributes will appear on the page. Of course, you can add as many
attributes as you want. Well, from the page, you can edit and delete any
attribute you want and can see the status of the attributes.
Add products to the store
After you have added categories and attributes, you add food items that
could be included in categories and attached to the attributes.
Click on the Products > Add product >
Fill up the form > click Save button.
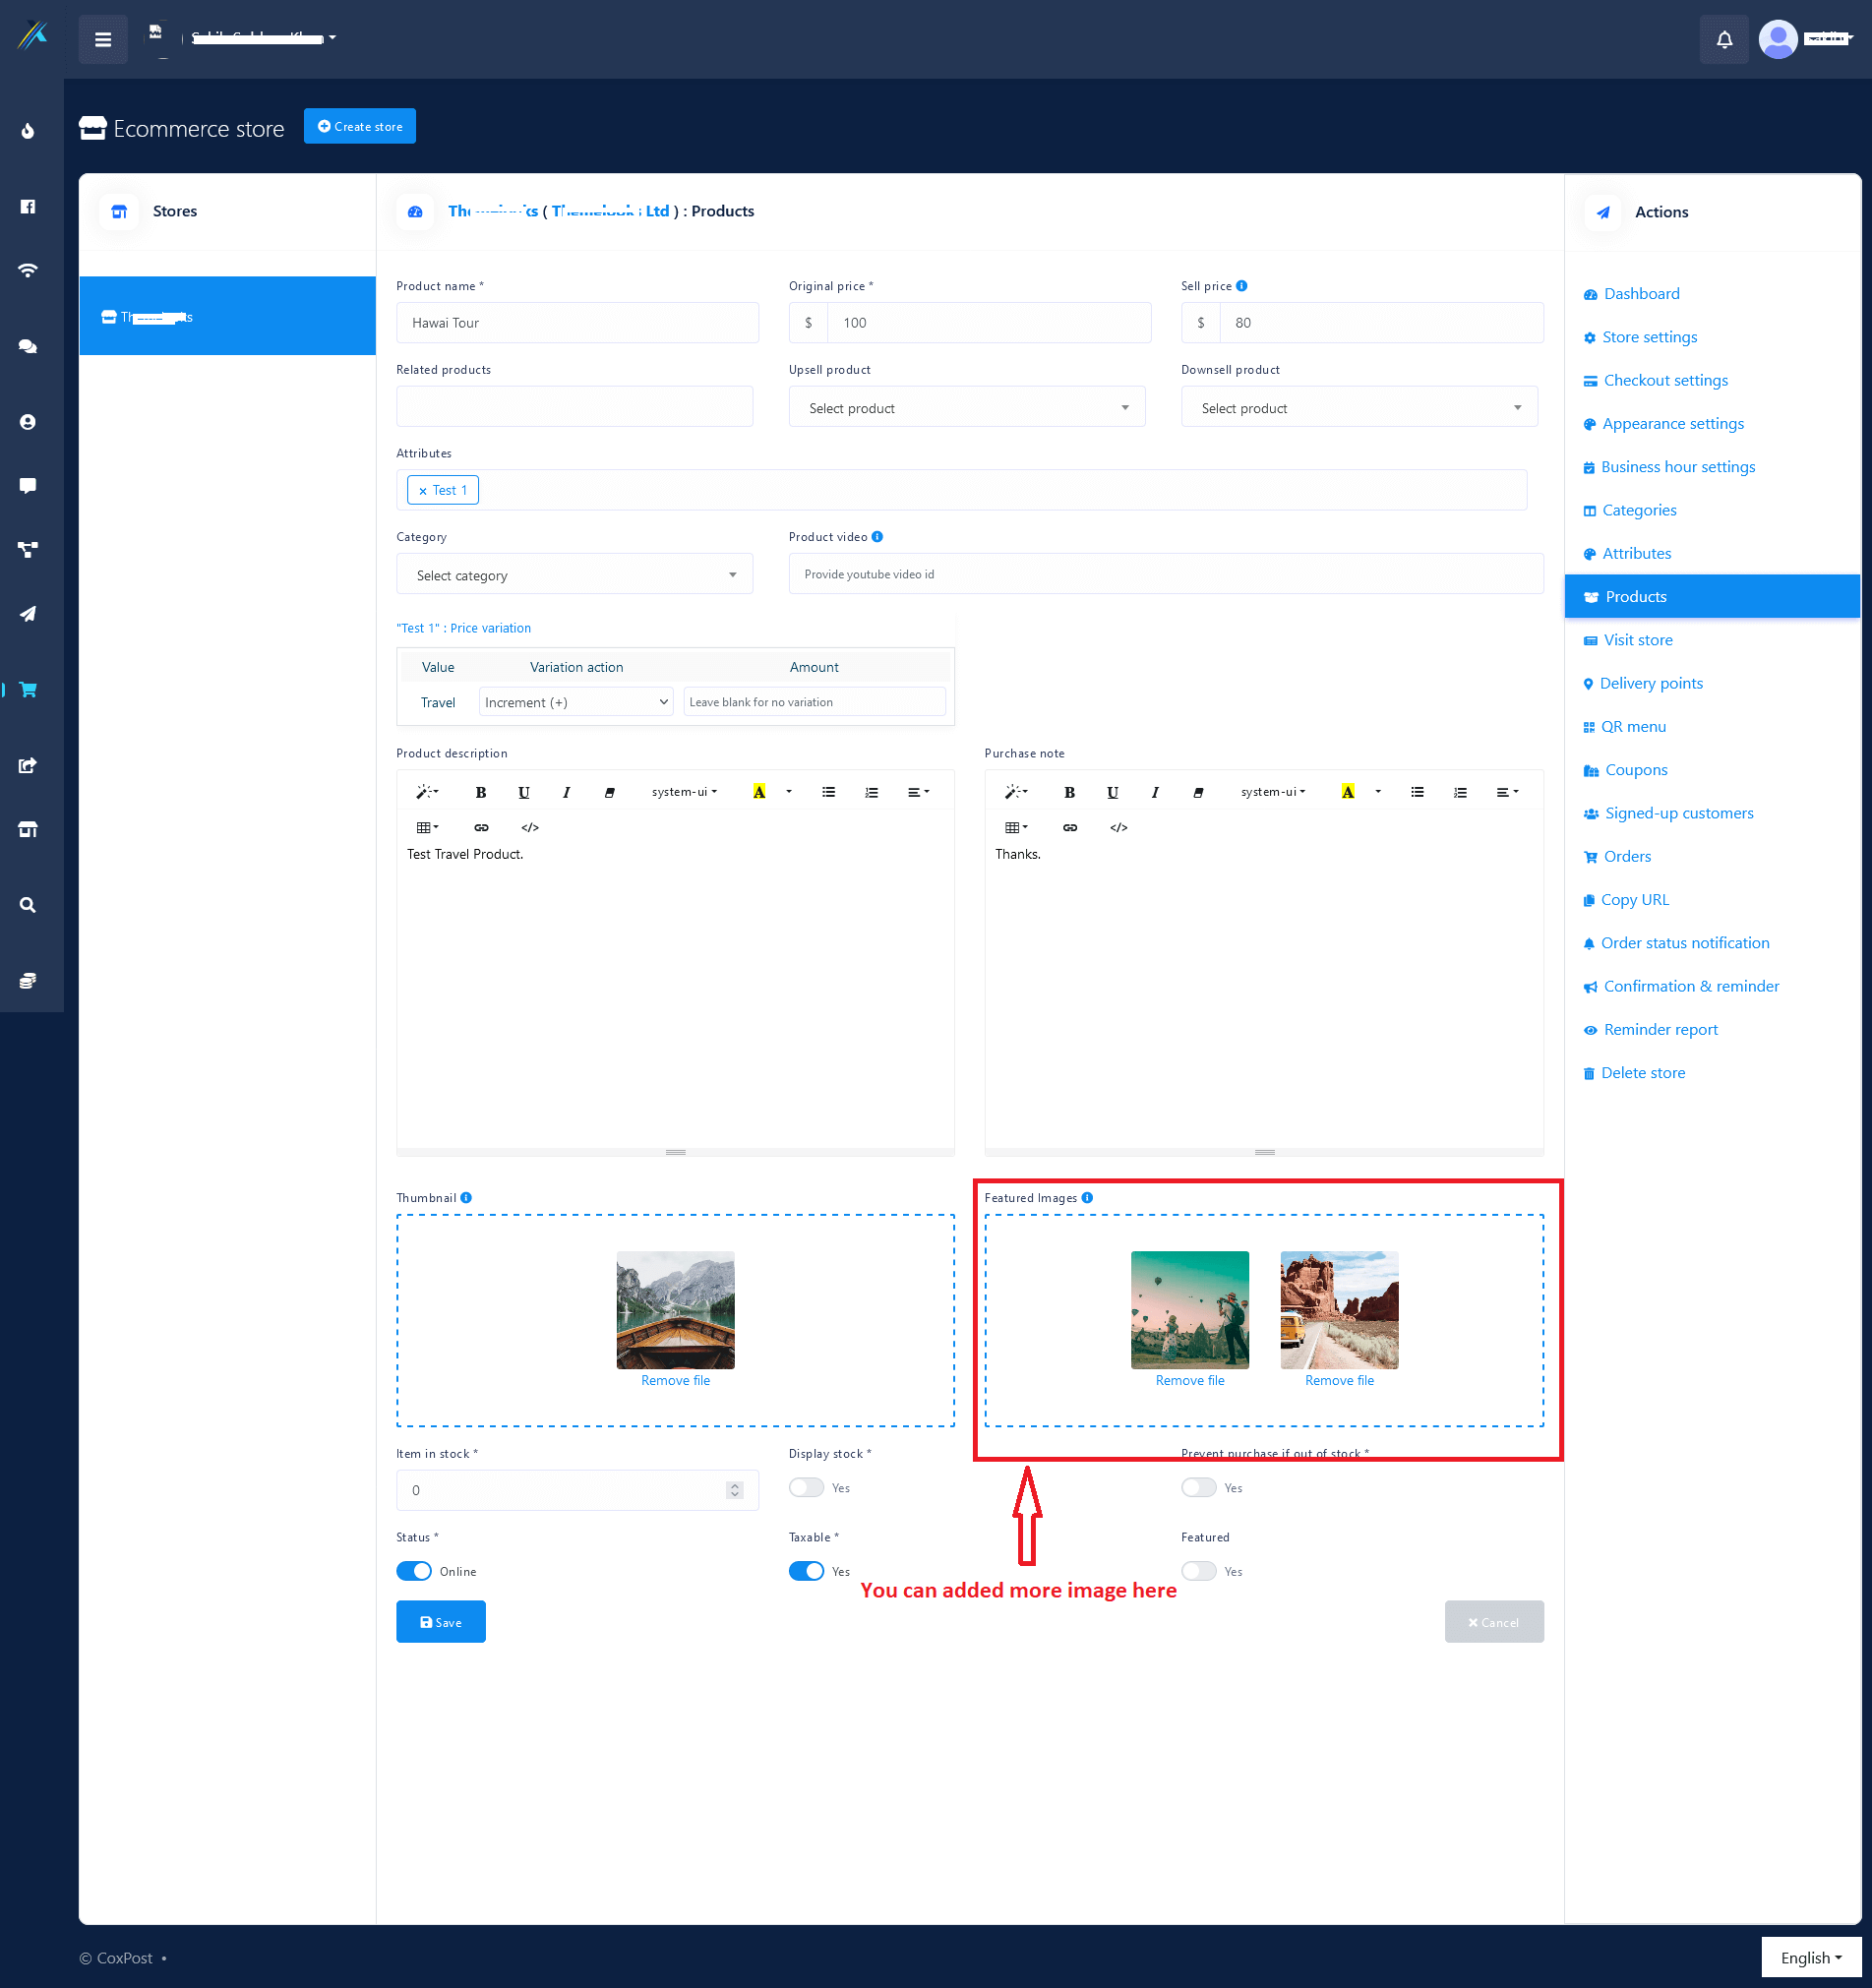
To add products, click on the ‘Products’ option in the ‘Action’ menu on
the left side of the dashboard. Straightway, the Products page will
appear with the Add product
‘Add product’ button at the top-right position. Now click on the button
and a form will appear. You have to fill out the form to add the
product-- providing some initial information about the products,
selecting categories and attributes. Moreover, you have to upload
thumbnails and featured images of the products-- you can upload one more
image of the products in the featured image option. Filling-out the
form, you have to click on the Save button. Instantly, your food
item will be added to your virtual shop.
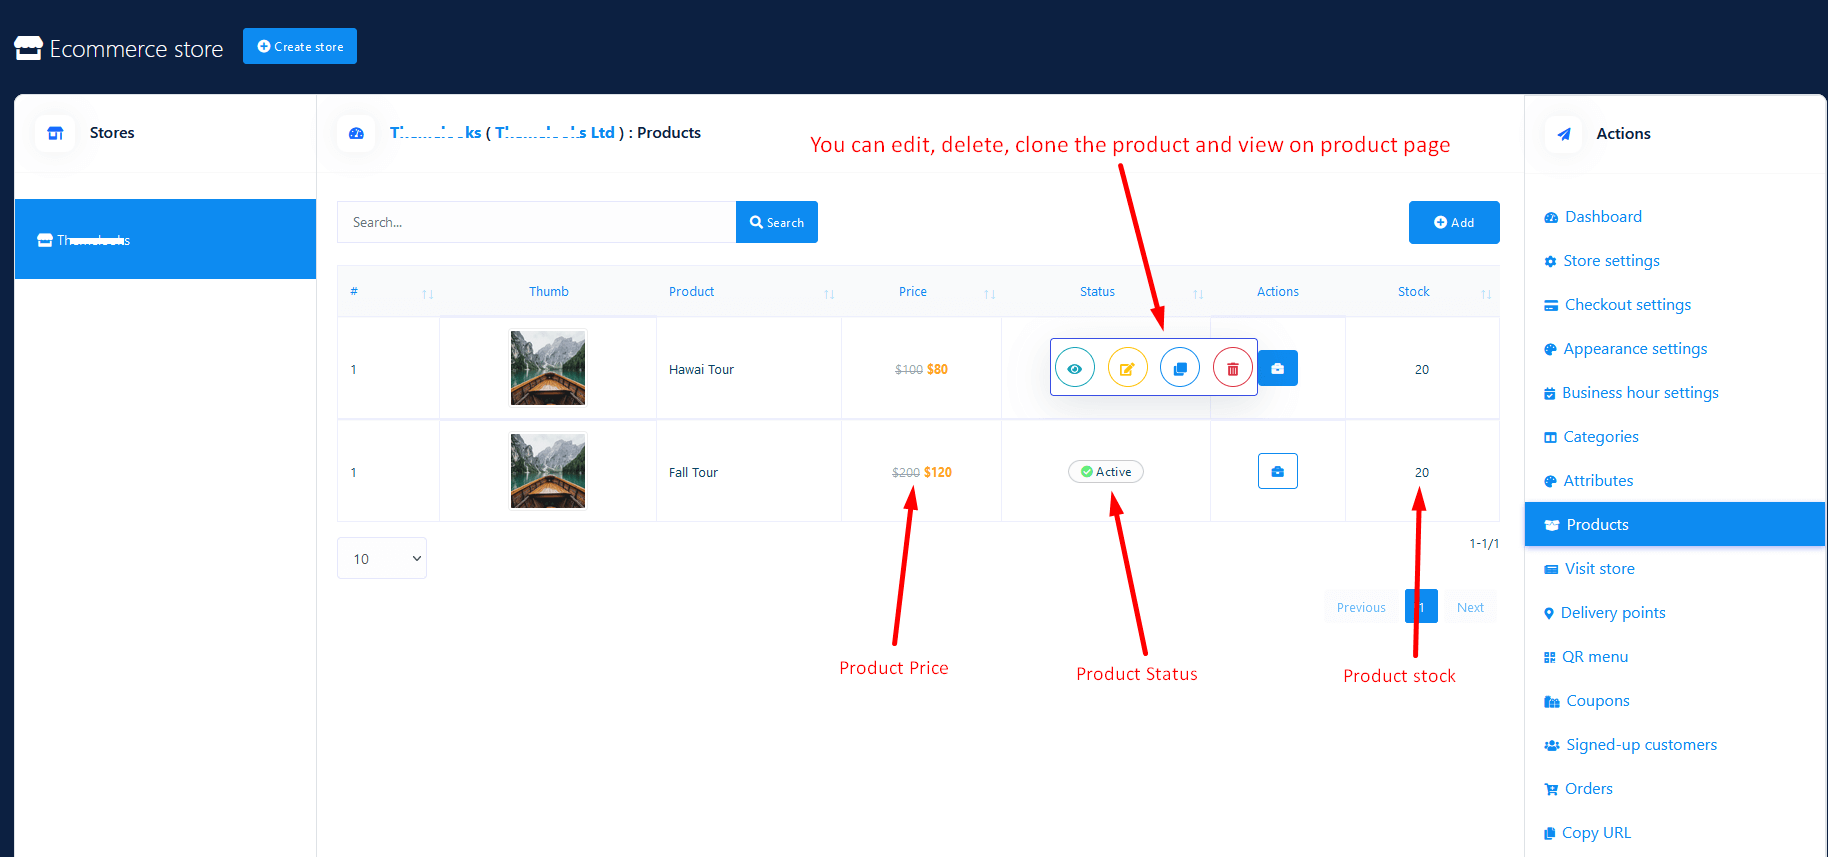
Likewise, you can add thousands of food items. And all the food items will be shown on the page. And you can edit, delete and clone the food items and see the product page of the product by the action button. Also, you can see the price and status of whether the product is active or inactive.
Checkout settings
Now you have to make a checkout setting for your virtual restaurant.
CoxPost’s ‘E-commerce store’ has integrated some online payment
methods-- PayPal, Stripe, Mollie, Razorpay, Paystack so that your
customers can pay via the payment methods easily. Besides, it supports
manual payment and cash on delivery systems.
Now you can make a specific checkout setting for a specific store.
Action > Checkout settings
To make a checkout setting, click on the ‘Checkout settings’ in the
‘Action’ menu at the left side of the store dashboard. Instantly, appear
a form that you have to fill up. First, you have to provide your account
information for any or some of the online payment methods that you want
to enable. Then you have to write down the instruction for manual
payment in the text area called ‘Manual Payment Instruction’.
After that, you will get a checkout payment option. From here, you can
enable any online payment methods and manual checkout for your store.
And ‘Cash on Delivery’ is enabled by default.
After that, you will get the ‘Currency and Label’ option. Here, you have
to select the currency of online payment methods, the currency through
which the clients will give the payment. For example, if you select
USD(Dollar) for PayPal and Stripe, your customers have to pay in Dollars
via PayPal and Stripe. Then you will see, in a row, three radio buttons
called Right alignment , Two decimal , and Display comma. By placing your
mouse cursor on the tooltips, you can see the functionality of these
buttons. Then you have to put labels for the ‘Buy Now’ button and Store Pickup title.
Then came the Tax and Delivery charge option. Here, you have to provide
the amount of Tax in percentage and delivery charge.

Then comes the address preference area. At first, you see a radio button
called Store Pickup. If you
enable the button, the clients can give food orders via your virtual
restaurant and receive food items sitting at the table of your real
restaurant. But if you disable the Store Pickup button, you have to
give a delivery address where the food will be delivered. Next to the
Store Pickup button, you will
see a button called Delivery
note . If you enable the ‘Delivery note’, button, your
clients will get a text area where they can write a delivery note. In
the delivery note, they can tell you how they want the delivery. For
example, he can tell that they want the delivery person to wear a mask
while delivering the food.
Then come some radio buttons, by disabling and enabling them, you can
determine which piece of information your clients have to provide while
giving their delivery addresses. The importance of the buttons is that
most of the time, you don’t need the country, state, city, and country
zip, because you already know the area of your clients. So you don’t
need to bother your valued customers to provide his country, state, city
and country zip you know beforehand. On the other hand, if you are
uncertain of your customers’ area, enable country, state, city, and
country zip so that they have to provide them.
After filling out the checkout setting form, click on the Save button and your checkout
setting is set.
Delivery Points
Since you have enabled the store pickup option, you have to set the delivery points. To do this, you have to add point names and point details. As for a restaurant, delivery points would be table and point detail would be table number. To add a delivery point, click on the ‘Delivery points’ on the left side of the dashboard. Instantly, a page will appear with the Add point button at top-right position. Click on the button and a pop-up form will appear. Then you have to fill-out the form by providing point(Table) and point details (For example, Table 1).

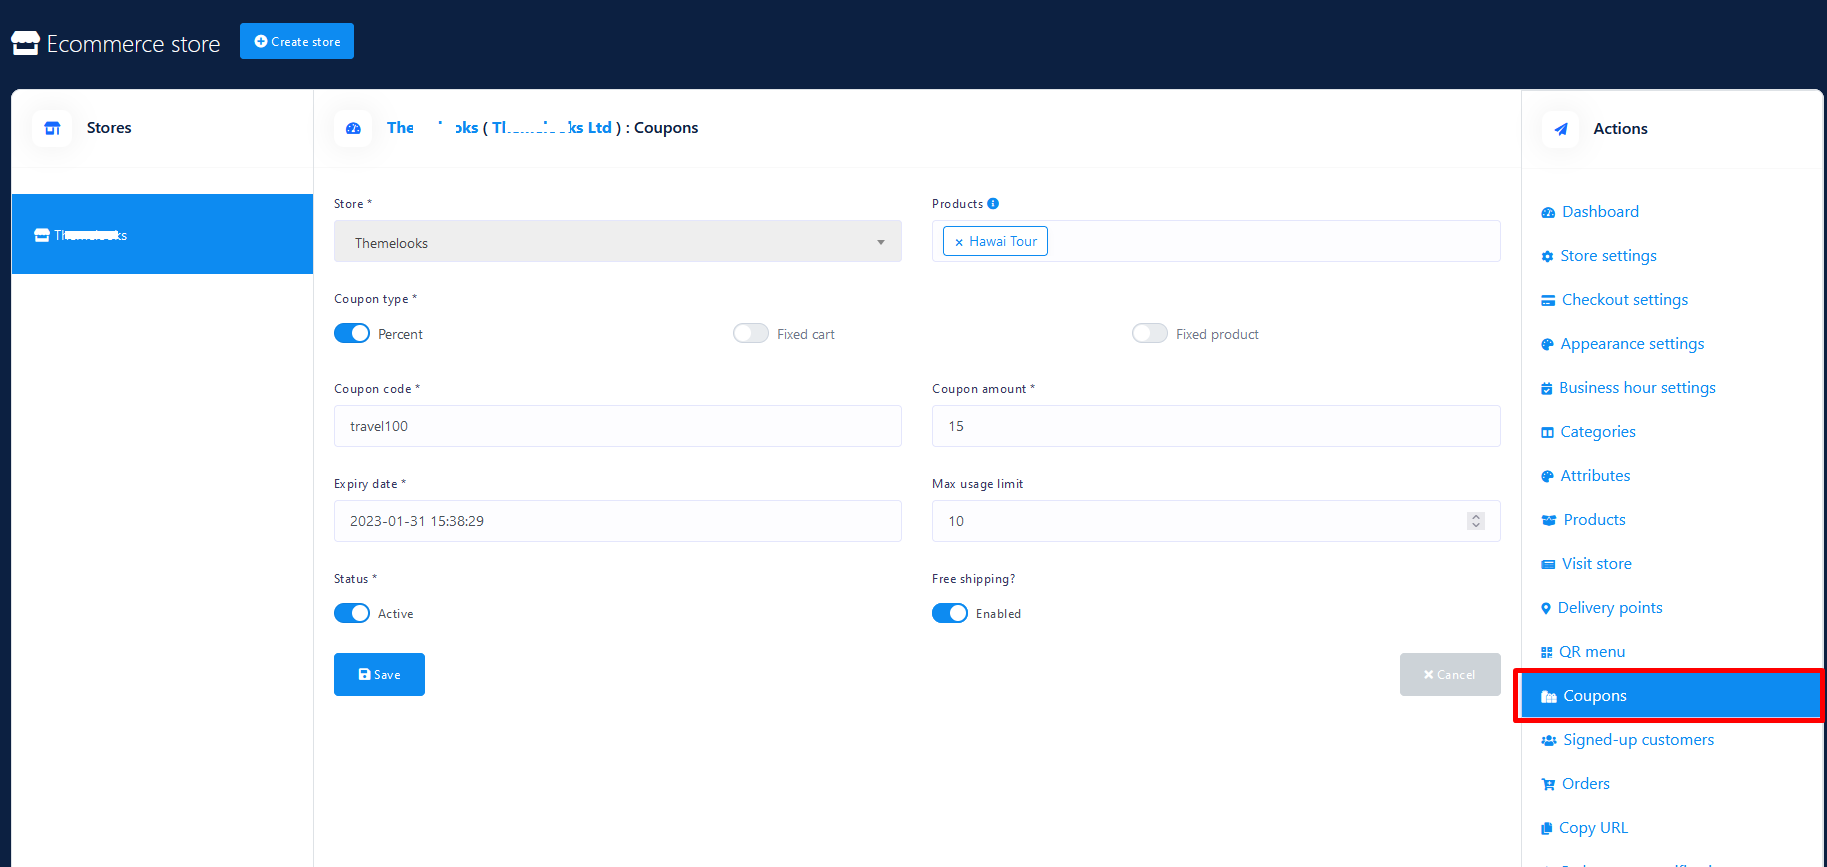
Coupon
If you want to give discounts on some specific products, coupons are
required.
Well, to make coupons, click on the coupons option in the ‘Action’ menu
at the left side of the Dashboard. And instantly, appear a form you have
to fill out to create a coupon.
At the products field, you have to specify the products the coupon will
be applicable.
E-commerce In CoxPost's store, you can make three types of coupons,
such as Percent, Fixed cart, and fixed products. Now you have to select
any of the three types of coupon code. Before selecting, you have to
understand the functionality of each type of coupon.
Let's explain them:
Percent– Percent coupon type is applicable for selected products only.
For example, if the cart contains three (3) t-shirts @ $20 each = $60, a
coupon for 10% off applies a discount of $6.
Fixed cart –A fixed total discount for the entire cart. For example, if
the cart contains three (3) t-shirts @ $20 each = $60, a coupon for $10
off gives a discount of $10. This coupon type will be applicable for all
the products you have added to cart whether you have selected the
products or not.
Fixed product – A fixed total discount for selected products only.
Customers receive a set amount of discount per item. For example, three
(3) t-shirts @ $20 each with a coupon for $10 off applies a discount of
$30.
Then you have to fill out the following boxes:
Coupon Code- Now give code for the coupon. Your customers will use the
code to get discounts on the products the coupon is applicable to.
Coupon amount- Then you have to provide the amount for the coupon.
Depending on the discount type you choose, the coupon amount will be a
Fixed value or percentage. Enter the amount without a currency unit or a
percent sign, which will be added automatically based on the discount
type you choose e.g., Enter ’10’ for £10 or 10%.
Coupon expiry date– Date the coupon should expire and can no longer be
used.
Max usage limit- You have to specify the number of times the coupon
could be used before reaching the expiration date.
Coupon deactivate- By disabling the status button, you deactivate the
coupon anytime.
Free shipping – If you enable Free shipping, the shipping cost will be
removed when the coupon is used.
Orders
You can see the details of the orders given by your clients on a page called Orders. Most importantly, using a thermal printer, you can print the invoices for the orders easily. To see the details of orders and print the invoices, click ‘Orders’, in the ‘Action Menu’ at the left side of the dashboard. Without delay, all the orders listed will appear on the page. Move the bottom scroll bar to see the whole details of the orders. From the page, you can change the status of the orders. Click on the ‘Status’ field beside the specific order and a drop-down menu with ‘Pending’, ‘Approved’, ‘Rejected’, ‘Shipped’, ‘Delivered’, and ‘Completed’ will appear. Now you can select one of them to see the status of the order later.
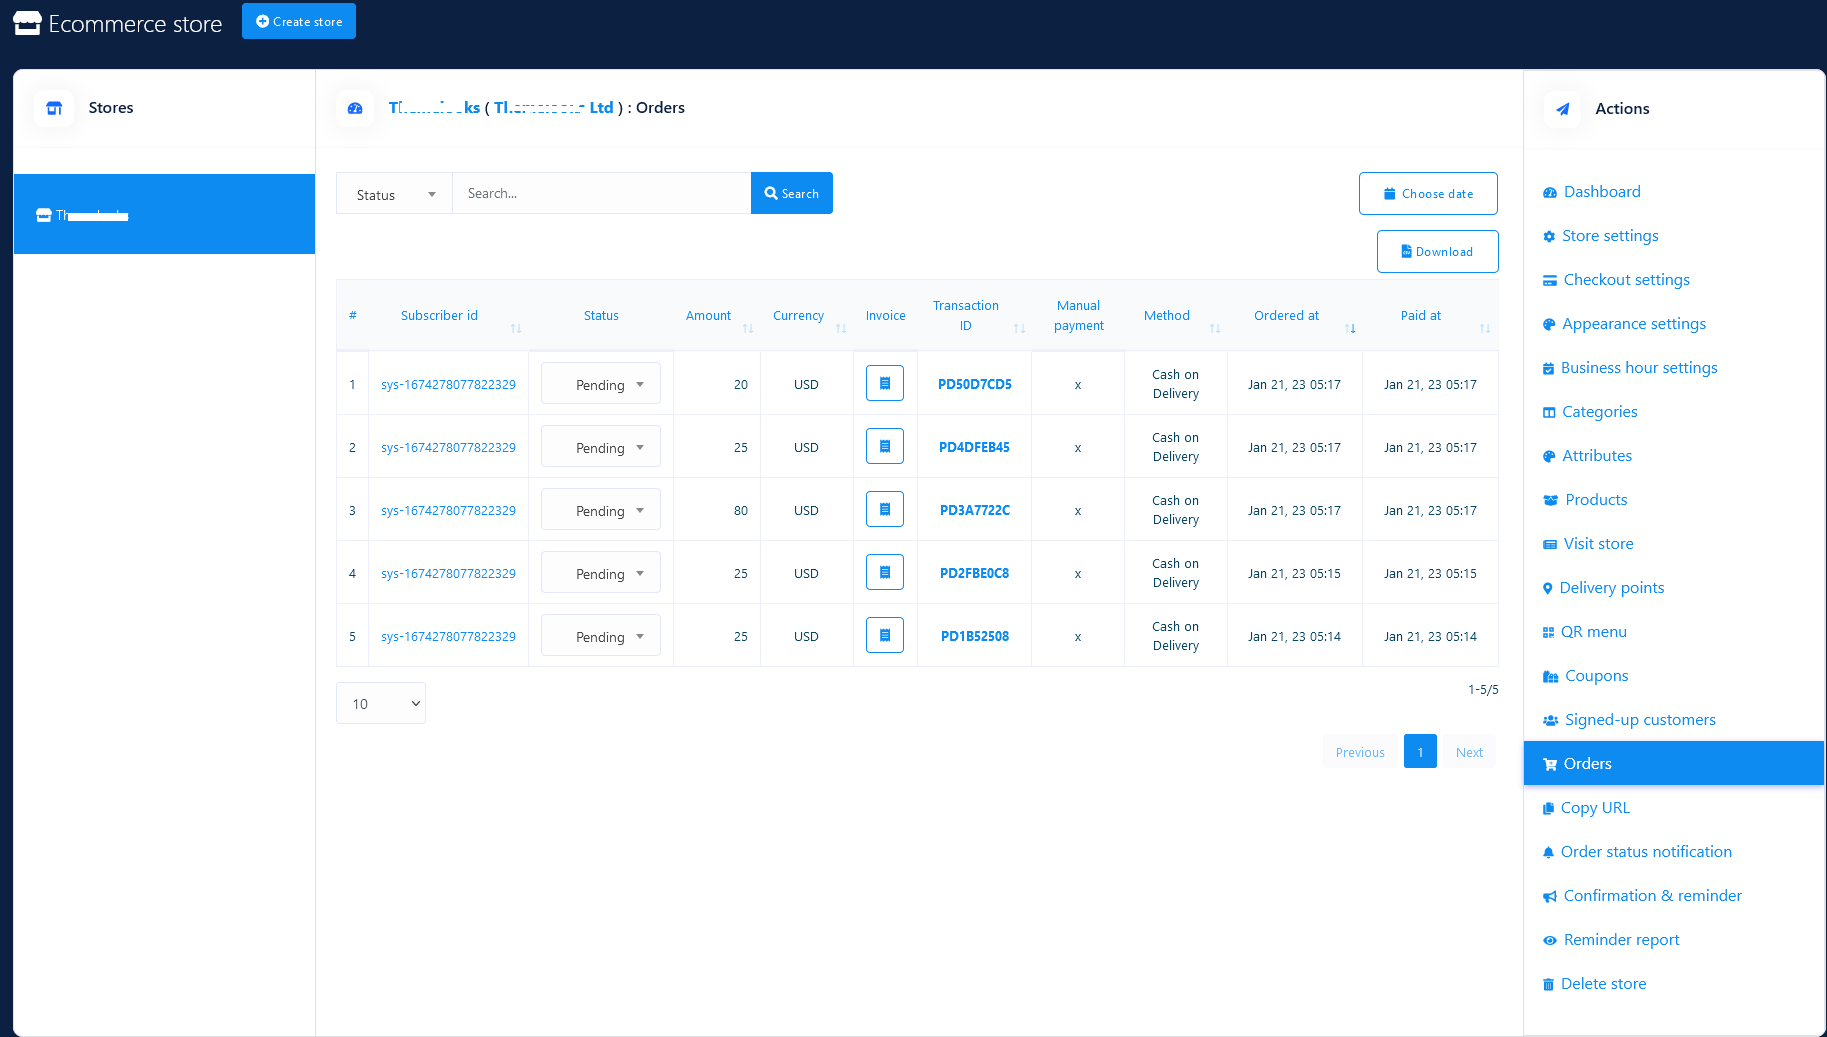
To print the invoice, click on the invoice field. Instantly, the order invoice will appear ready to be printed. At the top of the page, you will see three options — Large A4, Thermal 88mm, Thermal 57mm. Click on one of them and the print option will appear. After the invoice printed, give the copy to your cook. By clicking on the button called Choose date, you can see only the orders given at a specific time such as the last month. Also, you can download the list of orders in a CSV file by clicking on the Download orders button.
Confirmation and Reminder
If you make a setting, Confirmation and Reminder can send abandoned cart
recovery reminders to the clients if they leave your virtual restaurant
after adding food items to the cart. It is a very important feature
because it can recover lost sales by bringing back the potential
customers to your virtual restaurant. As well, the feature can send
confirmation messages just as they finish purchasing so that the
customers could be confirmed about their purchase.
To make a setting, click on the ‘Confirmation and Reminder’ option in
the left menu. Instantly, appear a form you have to fill-out. At the
top, you will see three options-- Messenger, Sms, and Email. Select
Messenger to send Confirmation message and Abandoned Cart Recovery
Reminder via Messenger and select Sms and Email respectively.
Well, if you want to set the confirmation message for messenger, first,
select messenger at the top of the form, and next, select ‘checkout
messenger’ at the bottom-right of the form. After that, you have to
write the content in the ‘messenger content’ box. And the My Order button, the order page
link embedded, will be automatically added to the confirmation message.
That is, your clients will get the message along with the ‘My Order’
button. And clicking on the button, the client can see the order
history. Of course, you can change the label of my order button.

Likewise, you can set confirmation messages for Sms and Email.
On the other hand, CoxPost’s E-commerce store can send three abandoned
cart reminders successively within one hour to 24 hours. And you can set
each abandoned cart reminder differently. Like confirmation messages, to
set abandoned cart reminders for messenger, first, select messenger at
the top then select any of the messenger reminders. Then click under it
and a drop-down menu will appear. From the drop-down menu, you can
select the hour (from 1 hour to 24 hours) you want to send the reminder
at. Of course, you can stop the reminder by selecting the ‘do not send’
option from the drop-down menu.
You can edit or rewrite the content in the ‘Messenger content’ box.
The product link is embedded in a button called the View Details , the product link
embedded and the ‘Checkout’ button with the checkout page embedded would
automatically be added to the reminder. Of course, you can change the
labels of the two buttons. By clicking on the View Details button, the client
can see all the items added to the cart. As well, by clicking on the
Checkout button’, the clients
directly enter the checkout page. You can also insert a coupon code,
while editing the content, in the message box to give discounts on the
products.
If a client leaves your virtual restaurant and returns and finishes
purchasing before an abandoned cart recovery is sent, the abandoned cart
recovery reminder will be stopped automatically, and instead, a
confirmation message will be sent. Likewise, getting an abandoned cart
recovery reminder, if a client returns to your virtual restaurant and
finishes purchasing, other recovery reminders in a queue will be
stopped, and instead, a confirmation message will be sent.
Reminder Report:
You can see the Abandoned Cart Reminder report by clicking on the
Reminder report
at the left panel of the Dashboard.

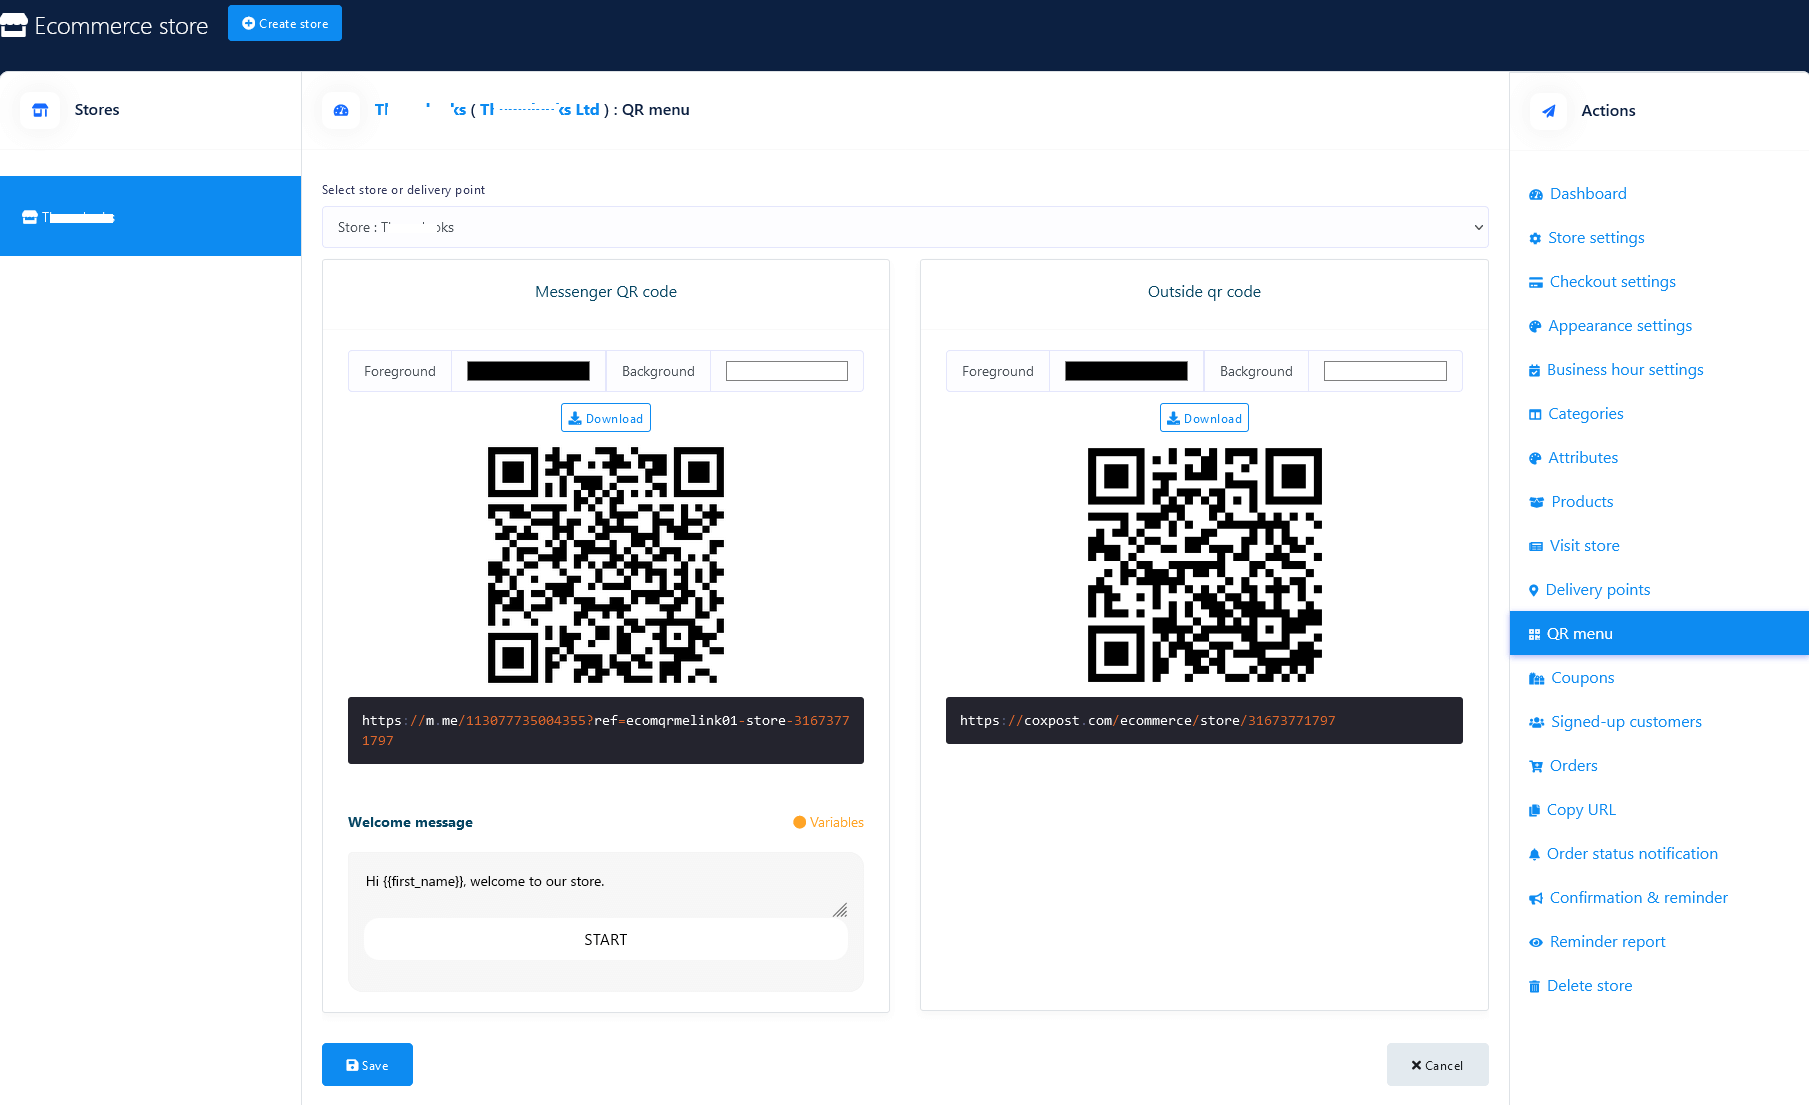
QR menu
Once you have finished creating your virtual restaurant, you need the QR
codes to provide them to your clients-- scanning the QR codes, your
clients can easily enter your restaurant not only via Facebook Messenger
but also on the browsers.
To get the QR codes, click on the QR menu and straightway, the ‘QR menu’
page will appear. On the page, you will see two QR codes-- one for
messenger and the other for browsers. Clicking on the Download button, you can easily
download the QR codes.
Now print the QR code and attach it to any suitable place, for example,
on the wall, and on the table so that your clients can easily notice and
scan the QR code to enter your virtual store, meaning to get the virtual
menu. Once the QR code is scanned, the virtual menu will appear on your
mobile screen inside messenger or on browsers. From the virtual menu,
your clients can choose foods and give orders while sitting at the table
of your restaurant without talking to your waiter.
In the COVID-19 pandemic, the QR code menu becomes essential because by
using it, people needn’t come in direct contact with any person while
eating out.
Under the messenger QR code, you can write a welcome message for your
clients. After writing the message, click on the Save button. Then your QR code
will hold the message you have written.
Visit store
To check how your virtual restaurant is set, click on the ‘Visit store’ option in the ‘Action Menu’ and you will redirect to your virtual restaurant in a new tab.
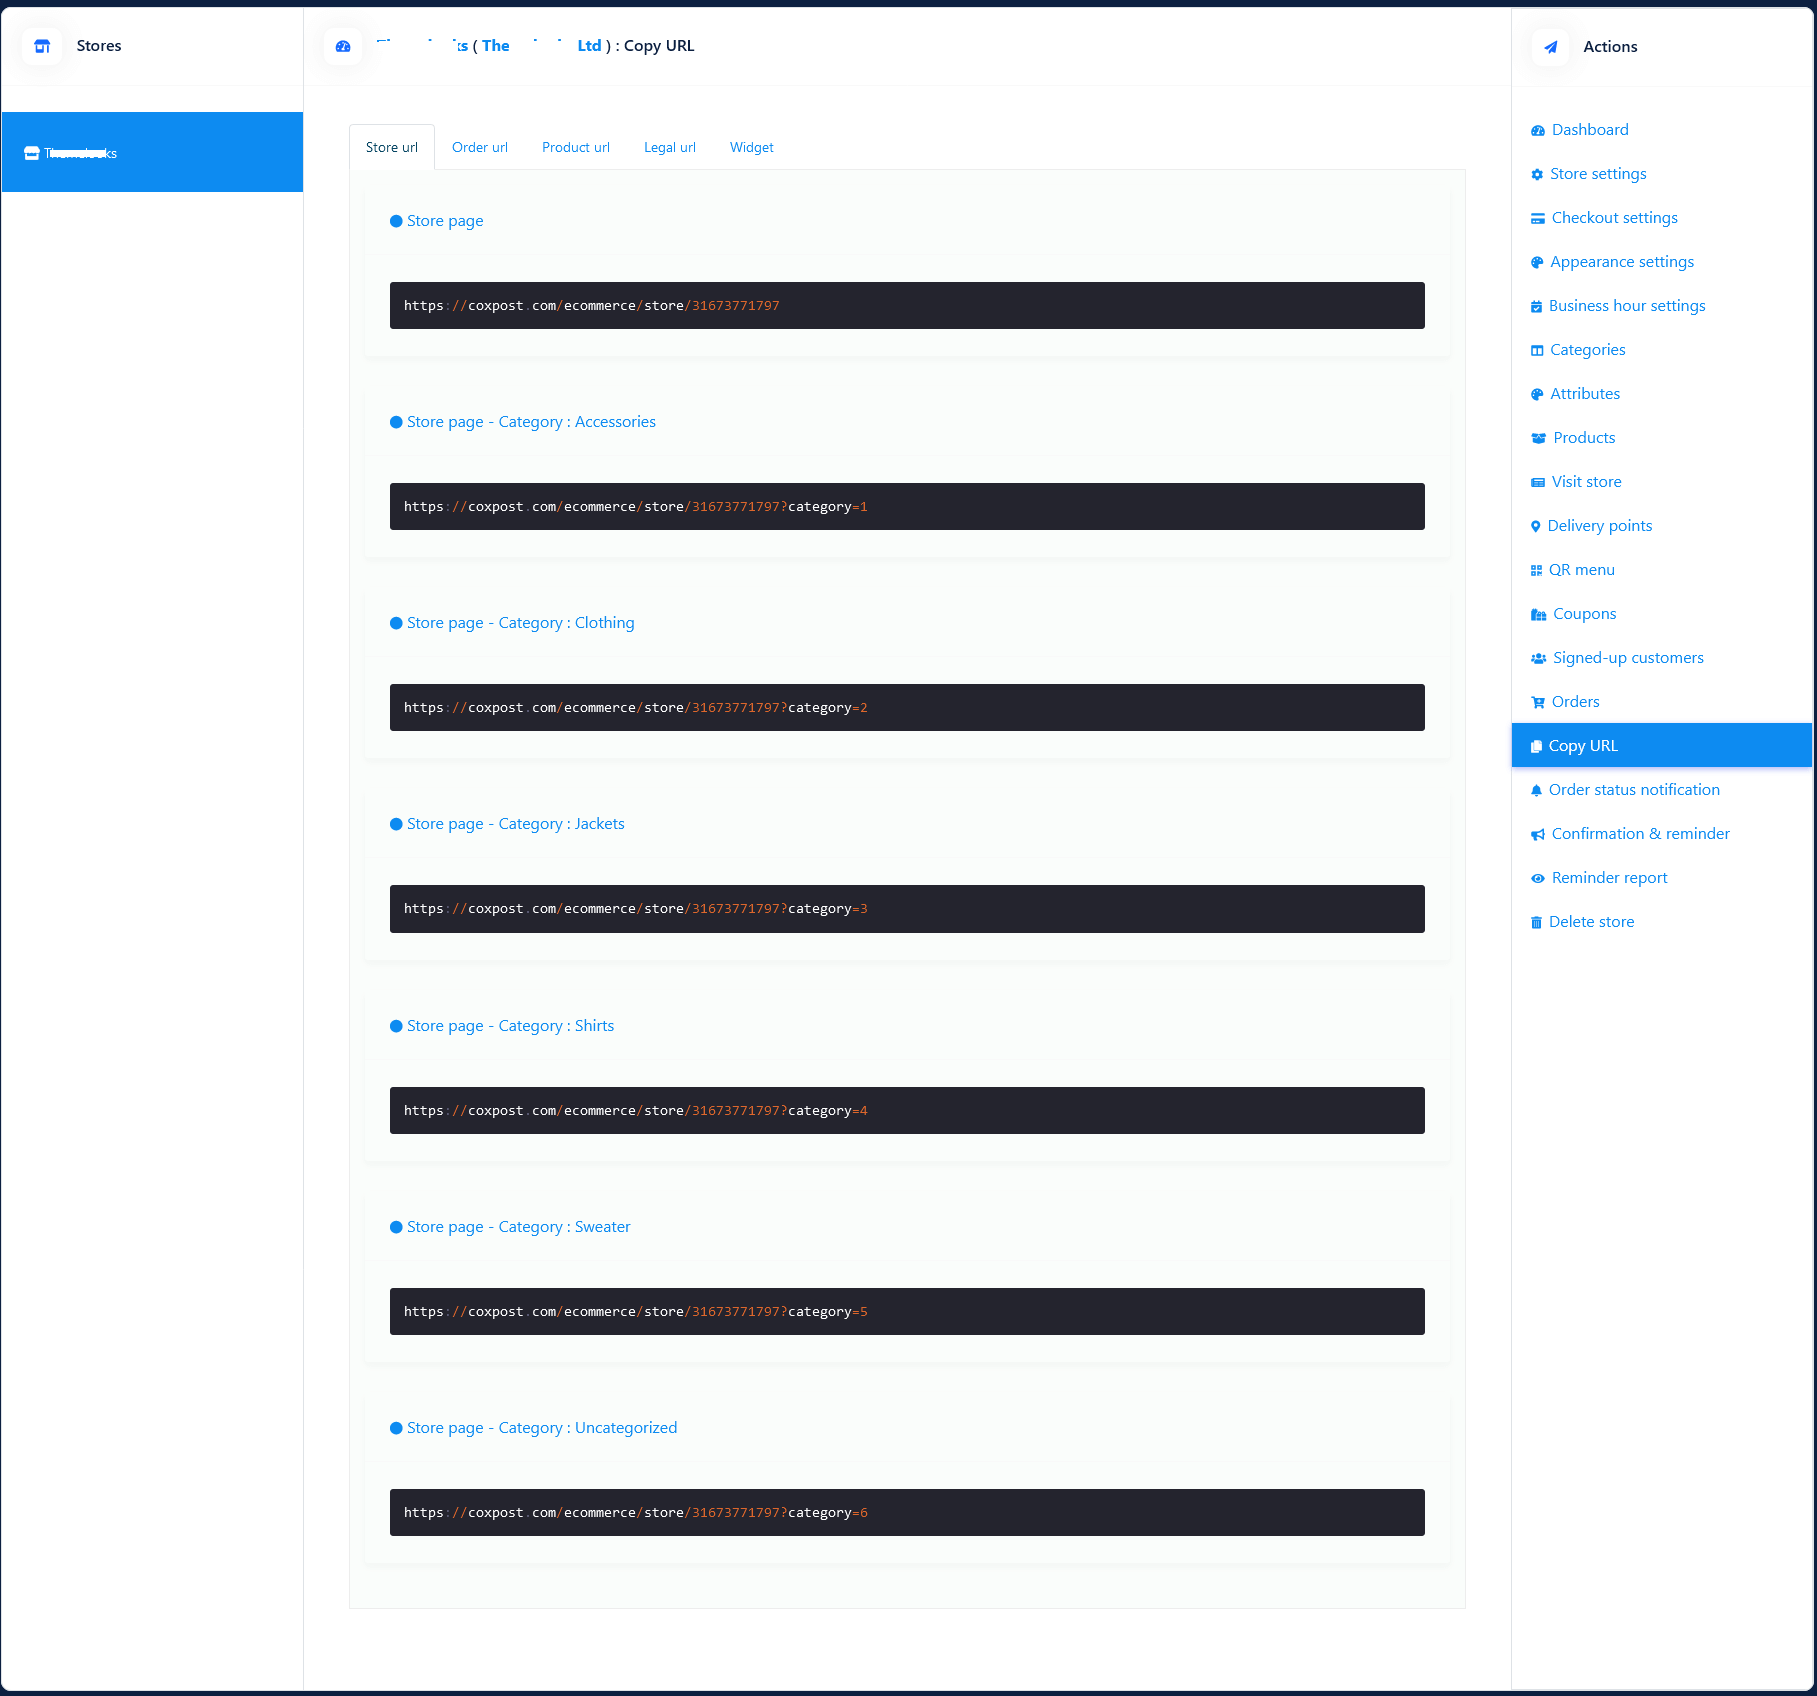
Copy url
Once you finish creating your virtual restaurant, the ‘E-commerce store’
has made different urls— Store url, Order url, Product url, and Legal
url-- for your virtual restaurant.
You need the urls if you want to integrate your virtual restaurant
directly to Facebook page messenger. And if so, your clients have to
send messages to the Facebook page to get access to your virtual
shop.
To get the urls, click on the ‘Copy url’ option in the ‘Action menu’ at
the left panel of the dashboard. Instantly, the copy url page will
appear with four types of urls. You need the two types of url—Store url
and Products urls-- to integrate the restaurant to the Facebook
page.
Now copy the store url and product urls and go to the messenger bot of
the CoxPost.
Click on the Messenger bot > bot settings > action> add bot
reply> fill out the bot reply settings form.
At the top of the messenger bot feature, you will see ‘bot settings’.
Click on the action button,
instantly a page called ‘bot settings’ will appear. Click on Add bot reply at the top-right
position of the page and appear a form you have to fill up to integrate
your virtual restaurant with Messenger bot.
At first, you have to provide a bot name and keywords in
comma-separated. Based on the keywords, the bot will reply. Now, you
have to select the reply type. To integrate your shop with Messenger,
you have to provide urls copied from your virtual restaurant. Therefore,
you have to select any of the reply types that come with button types
that support urls. Anyway, select text
with button’ reply type and any of the web url and webview buttons.
Select the web view full and a box called web url will appear— past the
url here. If you provide a store url, the entire shop will appear inside
the Facebook messenger, whereas for the product url, the specific
product will appear. Clicking ‘Add more button’ and ‘Add more reply’
button, you can add more buttons and replies.

Moreover, by the postback button, you can provide products in categories. Eventually, click on the Submit button to save the bot settings for your virtual restaurant. Now the Messenger bot will handle your virtual restaurant inside the messenger. That is, your clients can enter your virtual restaurant by sending messages.
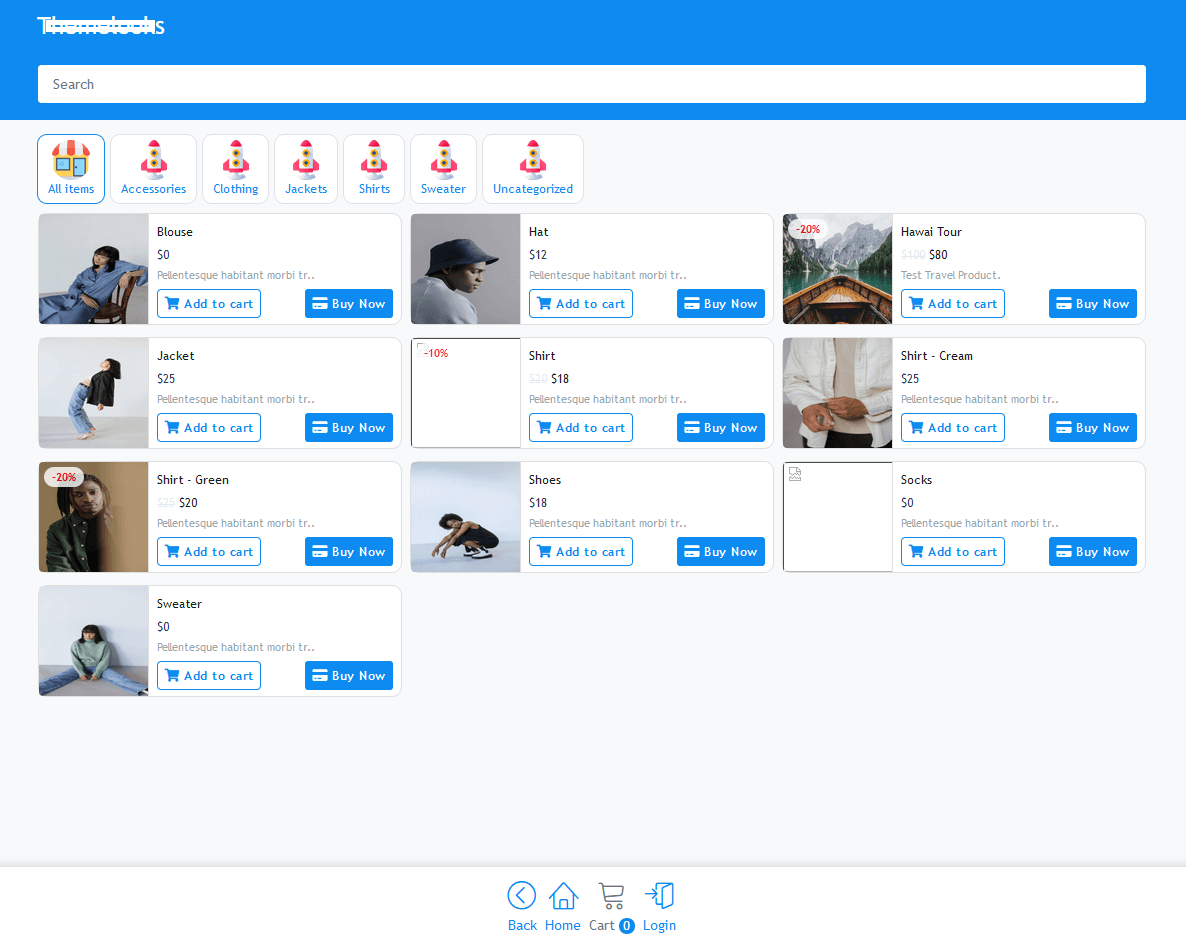
Usage of the E-commerce store
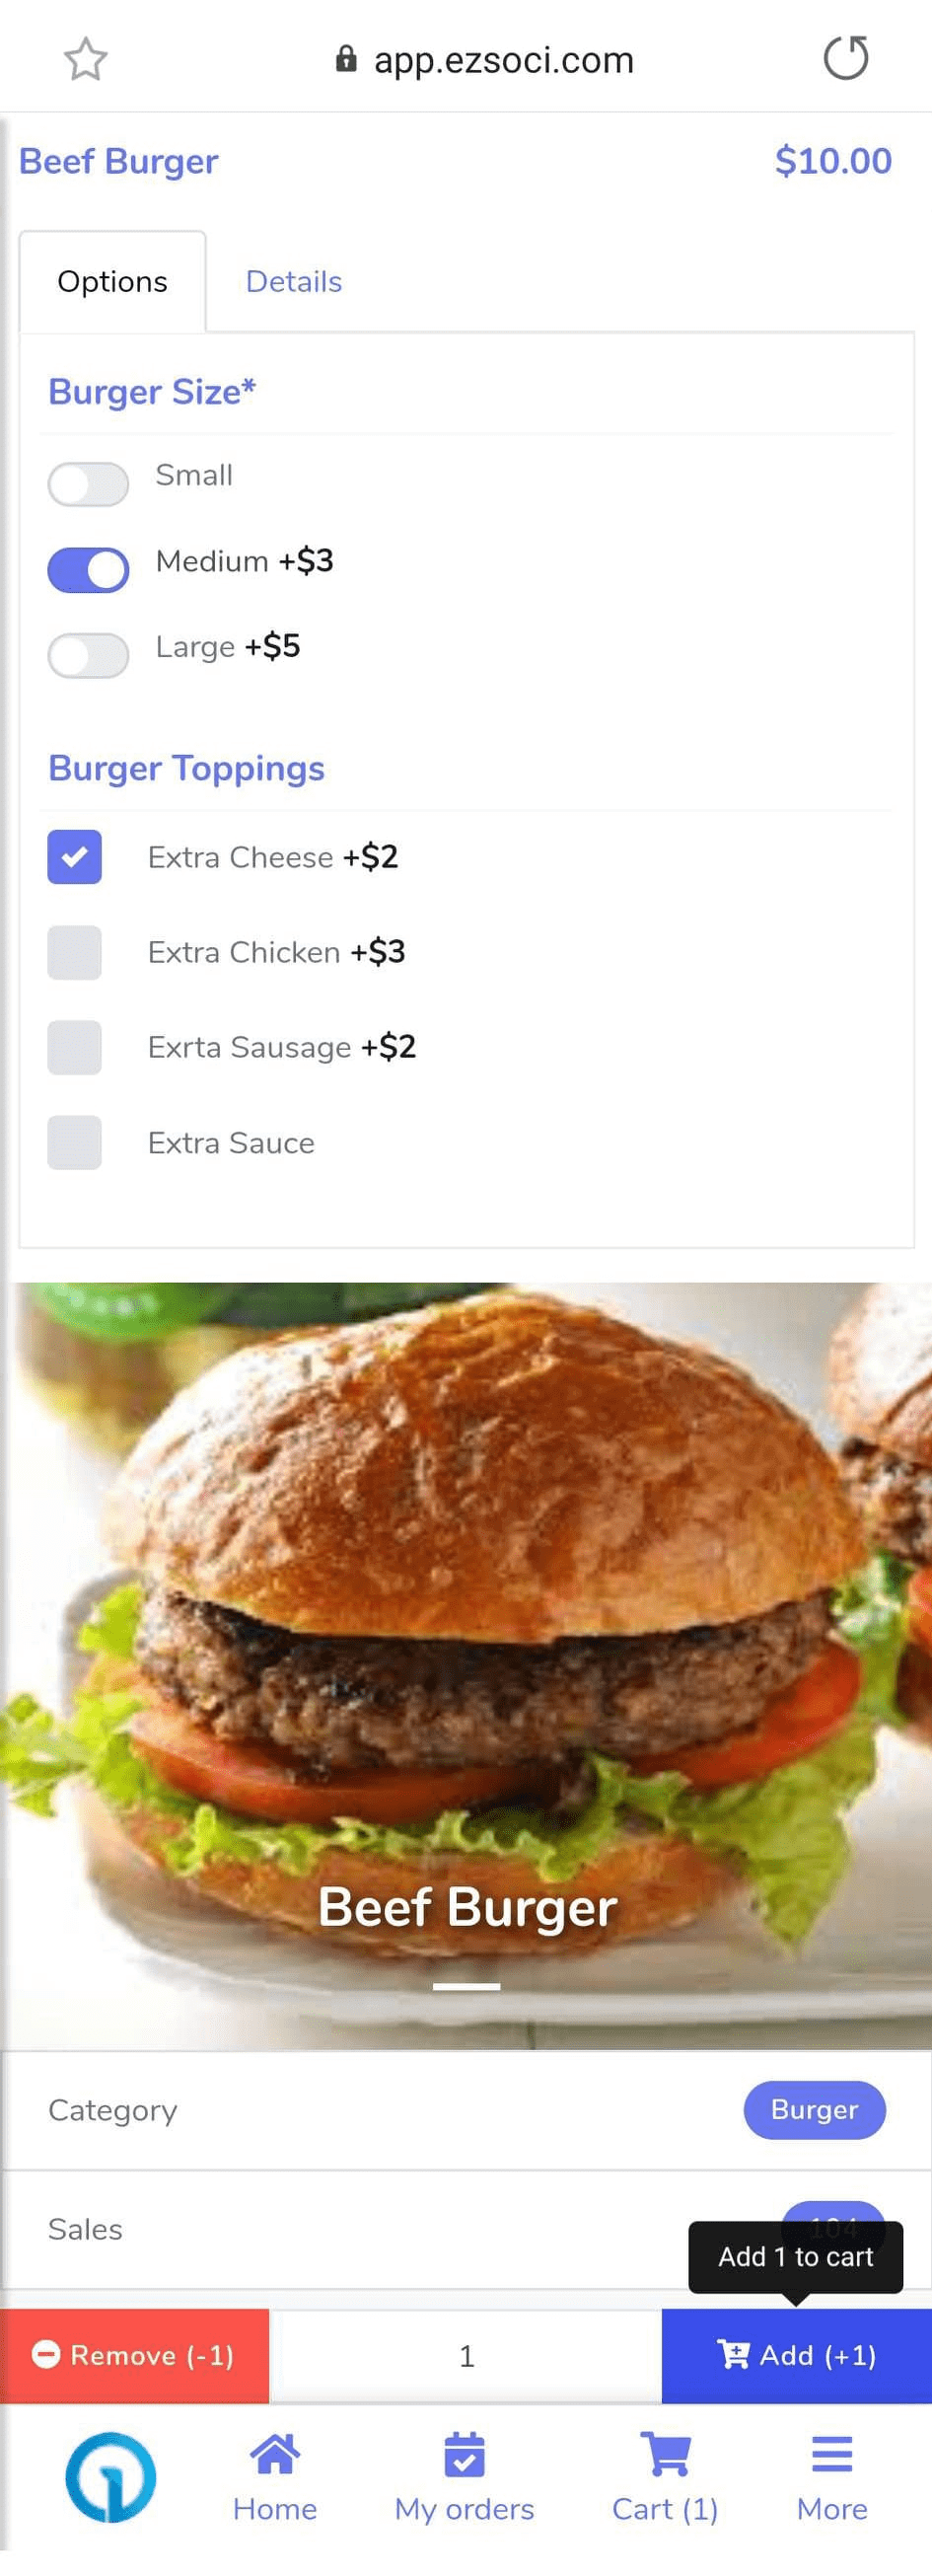
Your virtual restaurant created by CoxPost’s ‘E-commerce store’ can
generate two types of QR code— one for messenger and one for browser.
Well, just as a client scans the QR code, the digital menu appears on
the mobile screen. If they scan the QR code for messenger, they will
enter the digital menu inside messenger. On the other hand, if they scan
the QR code for browsers, they will enter the digital menu on the
browsers. The digital menu is more than a menu— it itself is the virtual
restaurant. From the digital menu, they can scroll different food items
and can choose from them, add the food items to the cart.

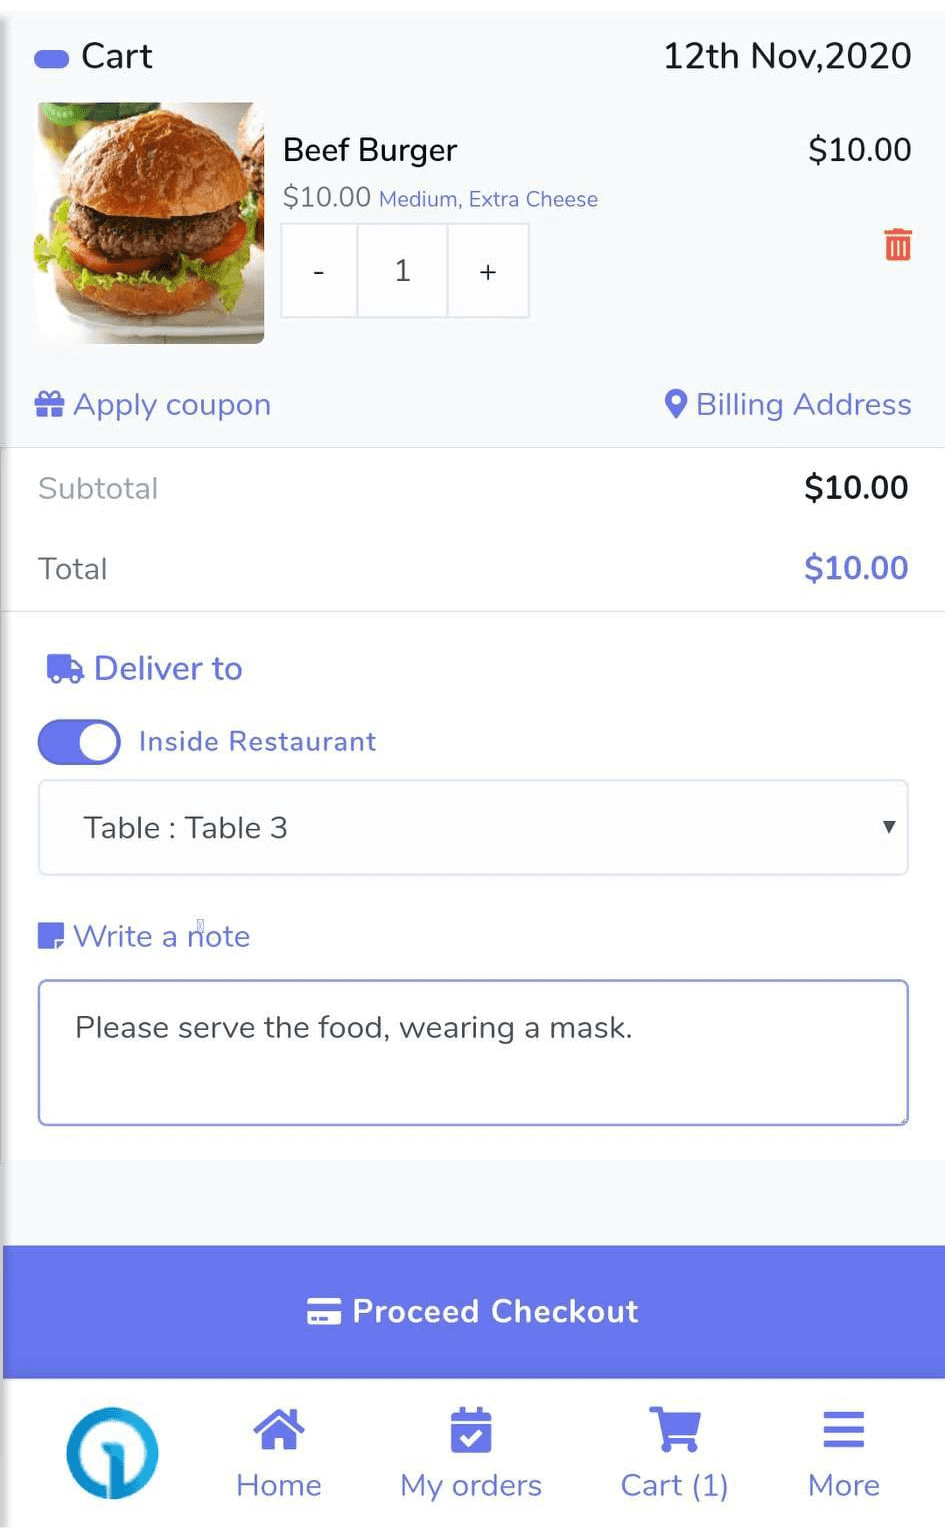
Then they have to let the virtual restaurant know where they want to
receive the orders-- they can receive food inside of the restaurant or
outside of the restaurant. If a client wants to receive food inside the
restaurant, they have to select the ‘In restaurant’ option. Then they
have to provide the delivery points such as the table number where they
are sitting at.
Anyway, they can also write a delivery note that will be sent along with the orders. In the delivery note, they can dictate how they want the delivery.
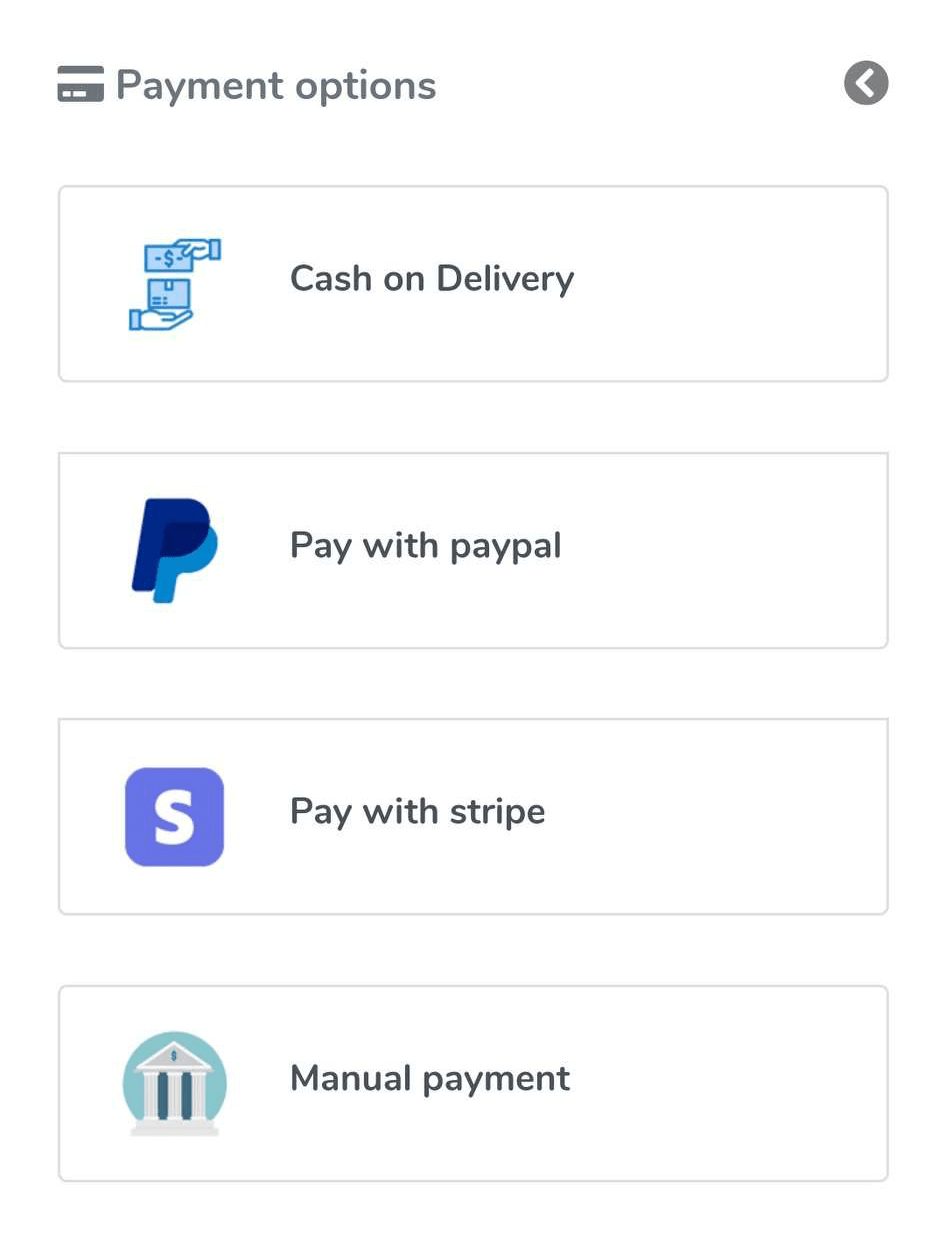
Then they have to make payments to finish the checkout. They can make payments via any of some online payment methods including PayPay and Stripe. Also, they can make payment via ‘Manual Payment’ or can choose ‘Cash on delivery.
Well, just as they finish making payments, a page will appear with a confirmation message at the top of the page and order details on the middle of the page. That is, the order has been given to the restaurant.
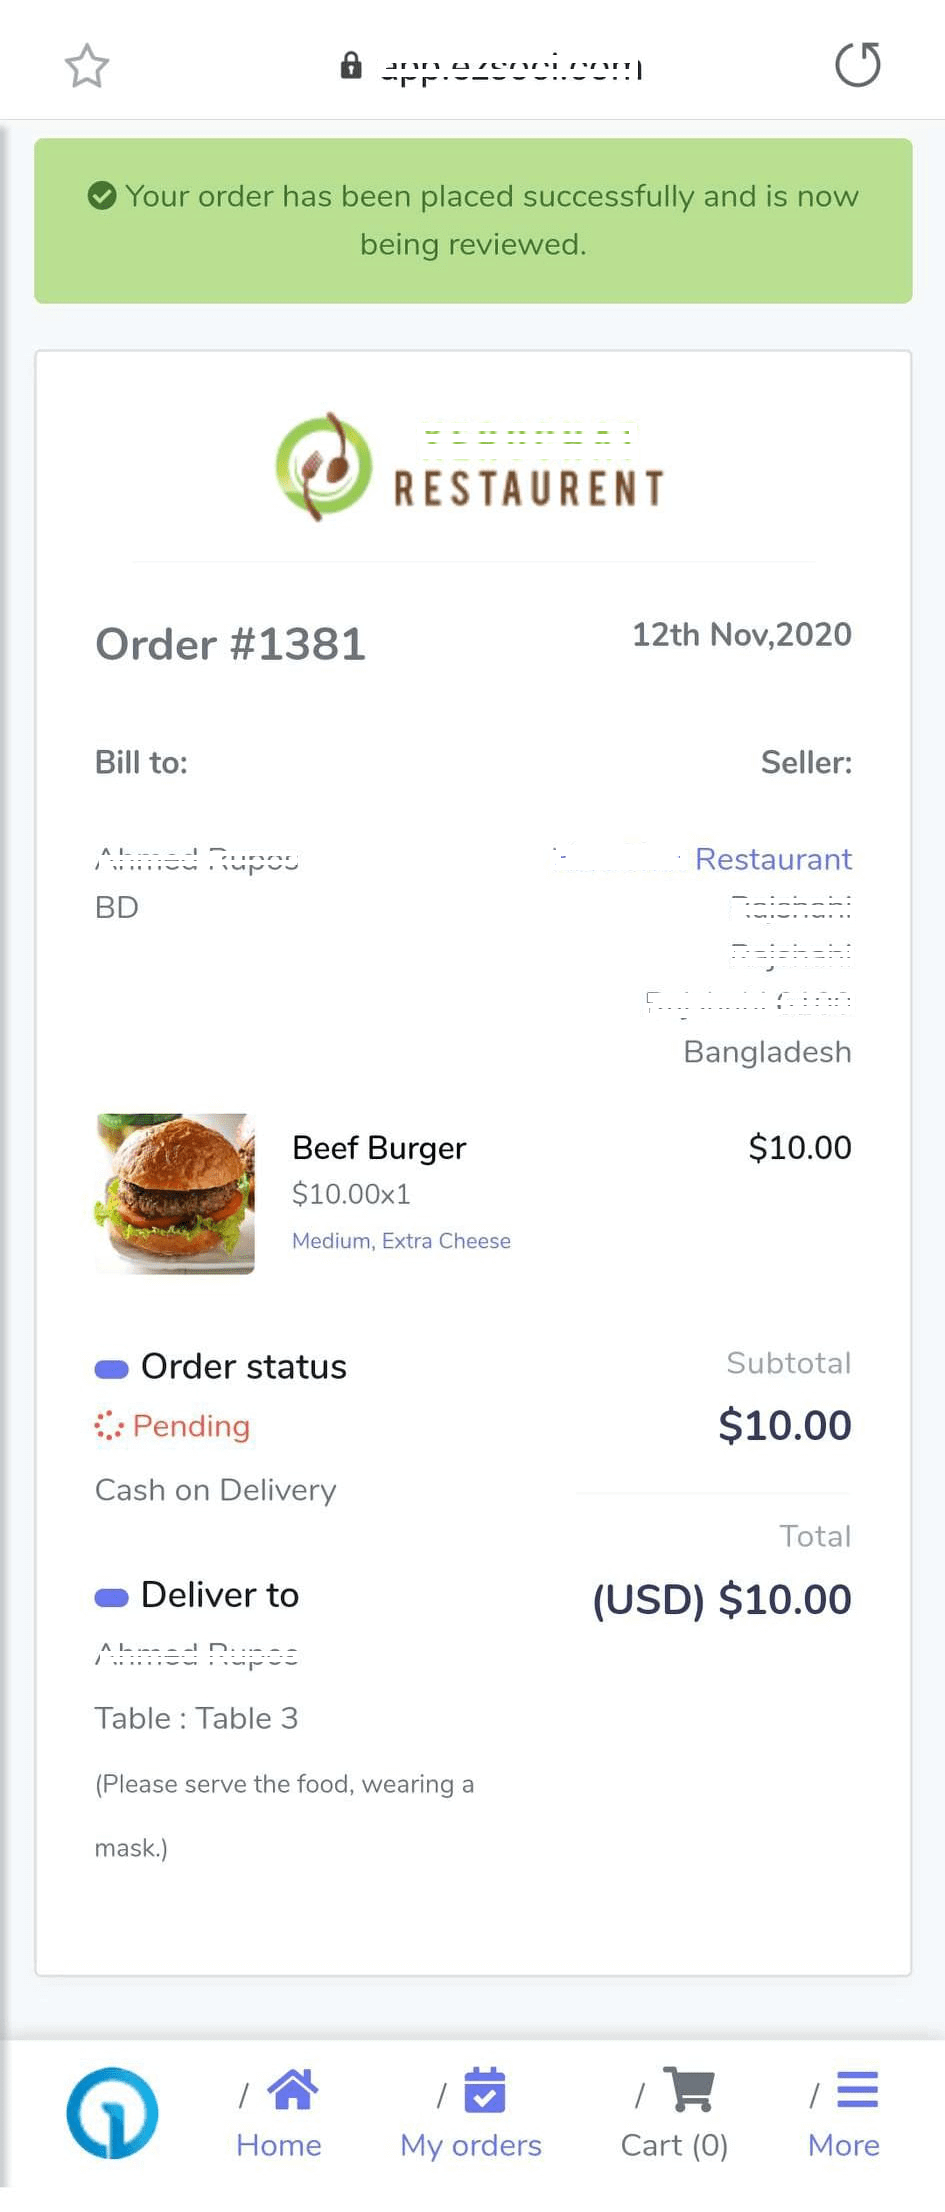
If a client wants, they can print the orders by clicking on any of the three printing options on the top of the page, though a client doesn't need to print the orders.
Private Reply
According to Facebook, Private Replies allows Businesses to reply to Post Comments and Visitor Posts made on their Page with a single message on Messenger.
Of course, the Instagram chatbot supports Private Reply. That is, if a user comments on an Instagram post, the bot will send a single message on Messenger to the user. The private Reply option is attached to the Comment Growth tools of CoxPost.
Let’s see how to enable the Instagram chatbot to send a Private Reply.
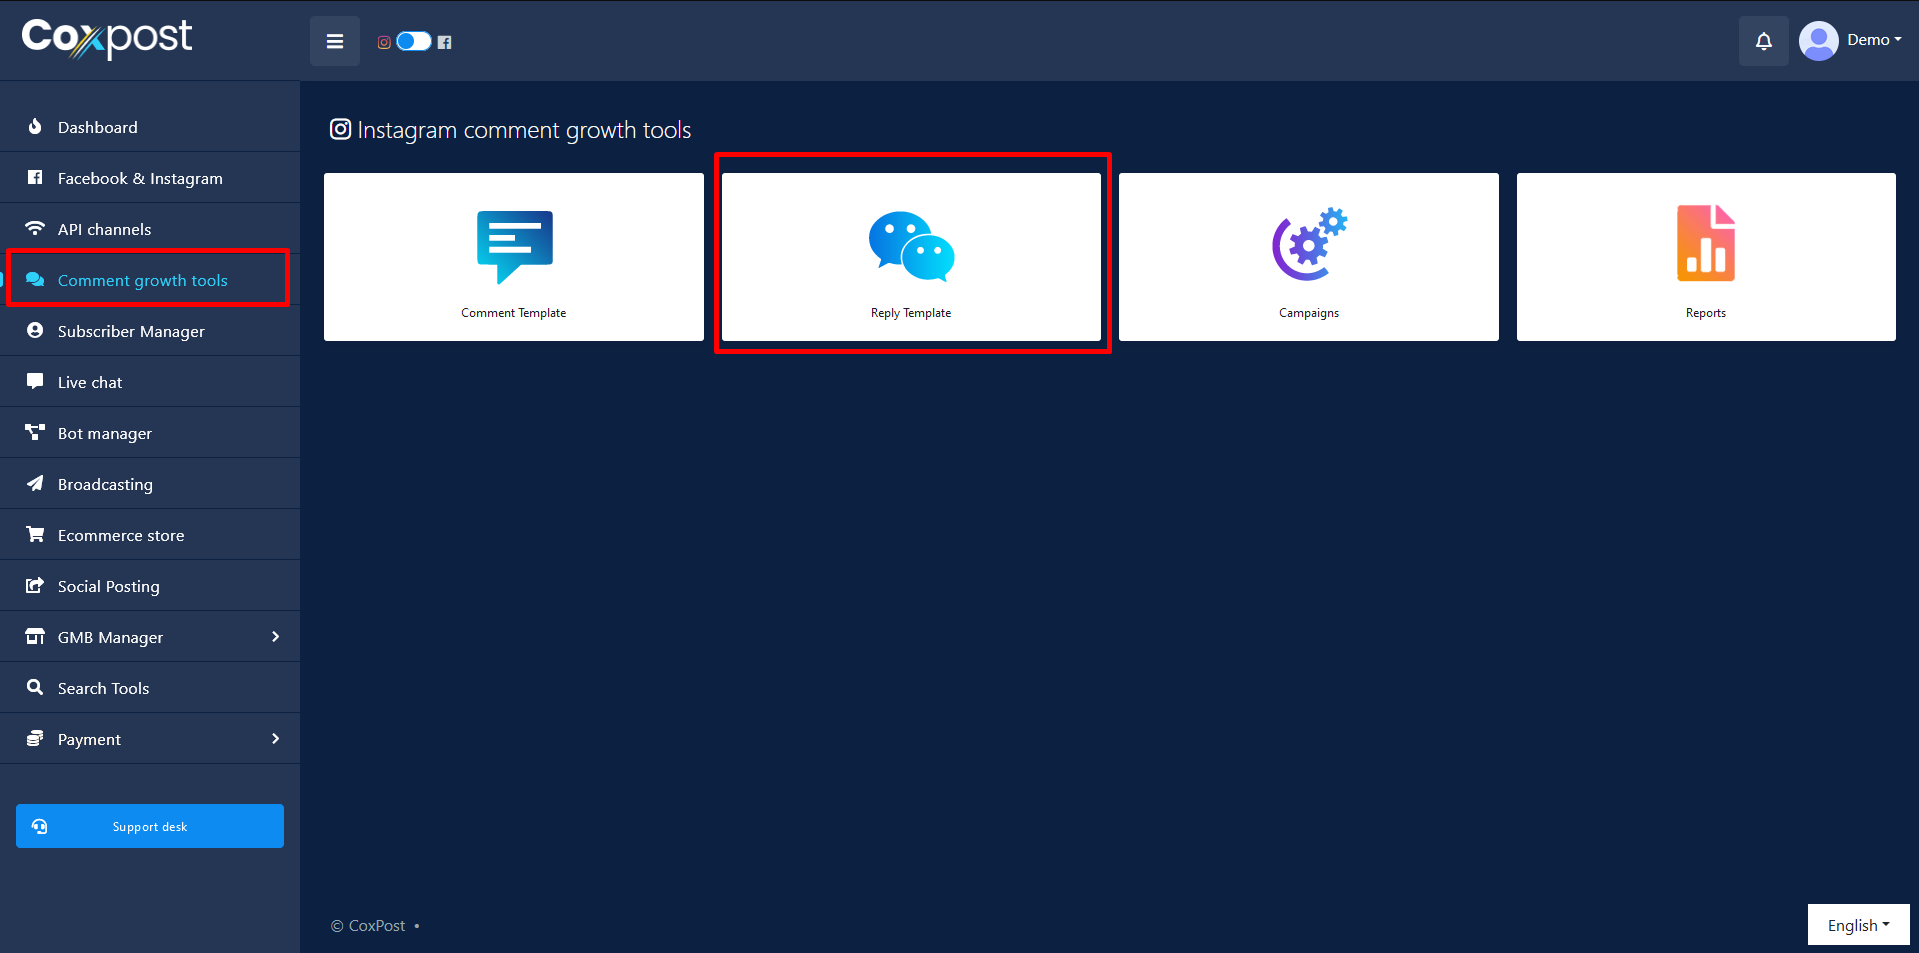
First, click on the Comment Growth Tools option at the left sidebar of the CoxPost Dashboard. Without delay, the Comment Growth Tools page will appear. The page is divided into two sections— Facebook and Instagram.
At the Instagram section, click on the Reply Template option or the detail Button.
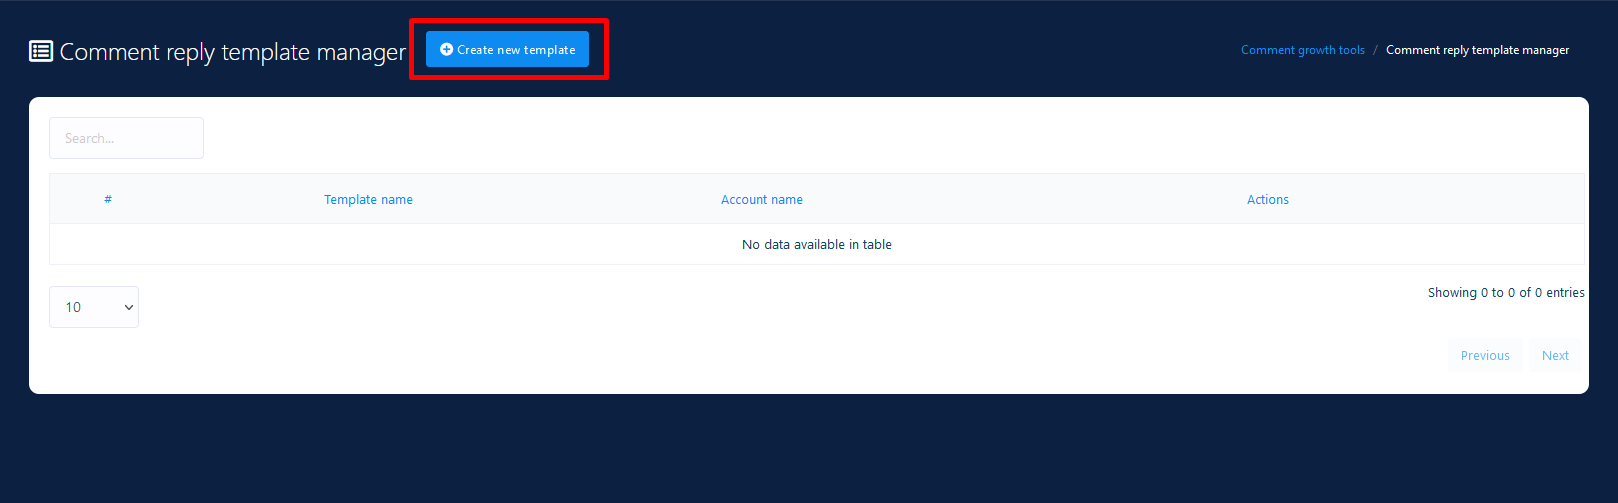
Instantly, will appear a Comment Reply Template Manager Page. Now click on the Create New Template button.
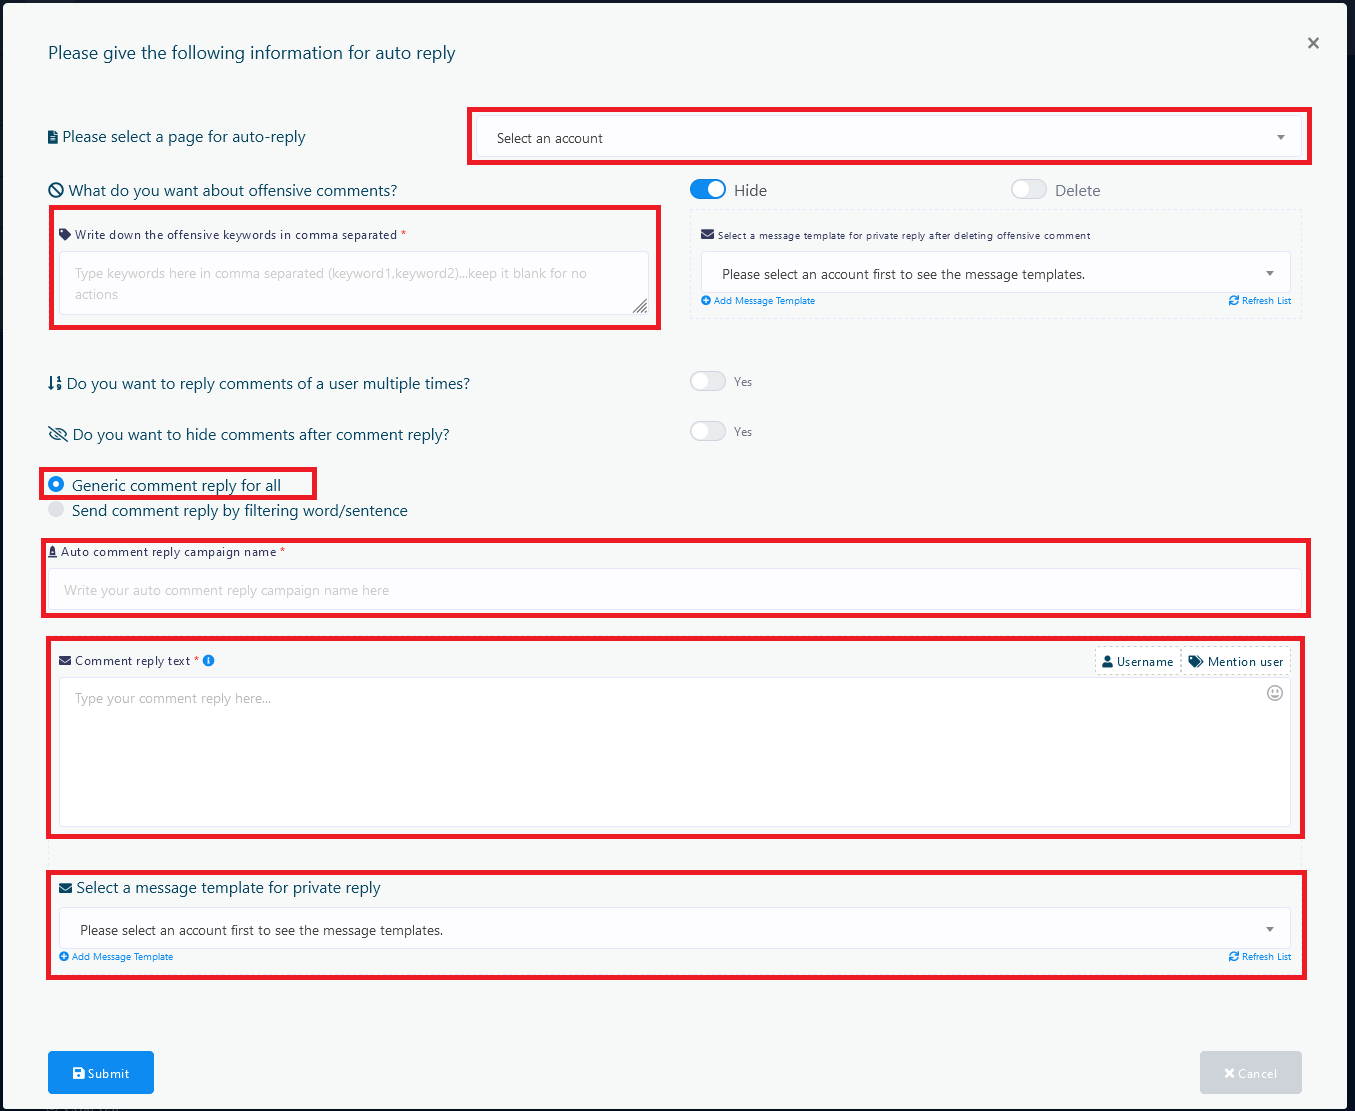
If you want to hide an offensive comment, select the Hide radio button. On the other hand, if you want to delete an offensive comment, select the Delete radio button. Then provide offensive keywords in the form. Now you have to select a message template for Private Reply from a drop-down menu.
Then select Generic Template for all. Then Give the Auto Reply Campaign a name.
After that, write the comment Reply in text.
Then You have to select a message template from a drop-down menu.
Now click on the Submit button.